How I’m Using Adobe Bridge
When I finally got around to exploring its capabilities, I found that Bridge can do some cool (and very useful) things. It's a speedy visual organizer. And, unlike the version that shipped with CS2, it doesn't seem to steal all my RAM unless it's trying to render thumbnails for a big set of EPS or PSD files. I've only been using it about a week but I keep catching myself saying, "Well in Bridge, you can..."
Here are several ways I'm using it:
BROWSING IMAGES
This is Bridge's primary purpose, and one that is handier than I would have thought. With it, I can browse through image folders quickly and easily. And unlike regular system browsing, many Adobe filetypes (including PSD, AI, INDD, PDF and EPS) show fully rendered thumbnails and previews. SWF files don't show up in thumbnails but do play through in the Preview pane. I keep an archive of inspirational screenshots on my hard drive, and I've made this folder a bookmarked "Favorite" in Bridge so it's easy to access. My stock photo library is also a favorite. I can zip through quickly and get a large preview in one click. If I see something I like, I can double-click to open or drag it into Photoshop, Flash, or even Dreamweaver. Based on my personal browsing needs, I've set up a custom workspace that looks like this:
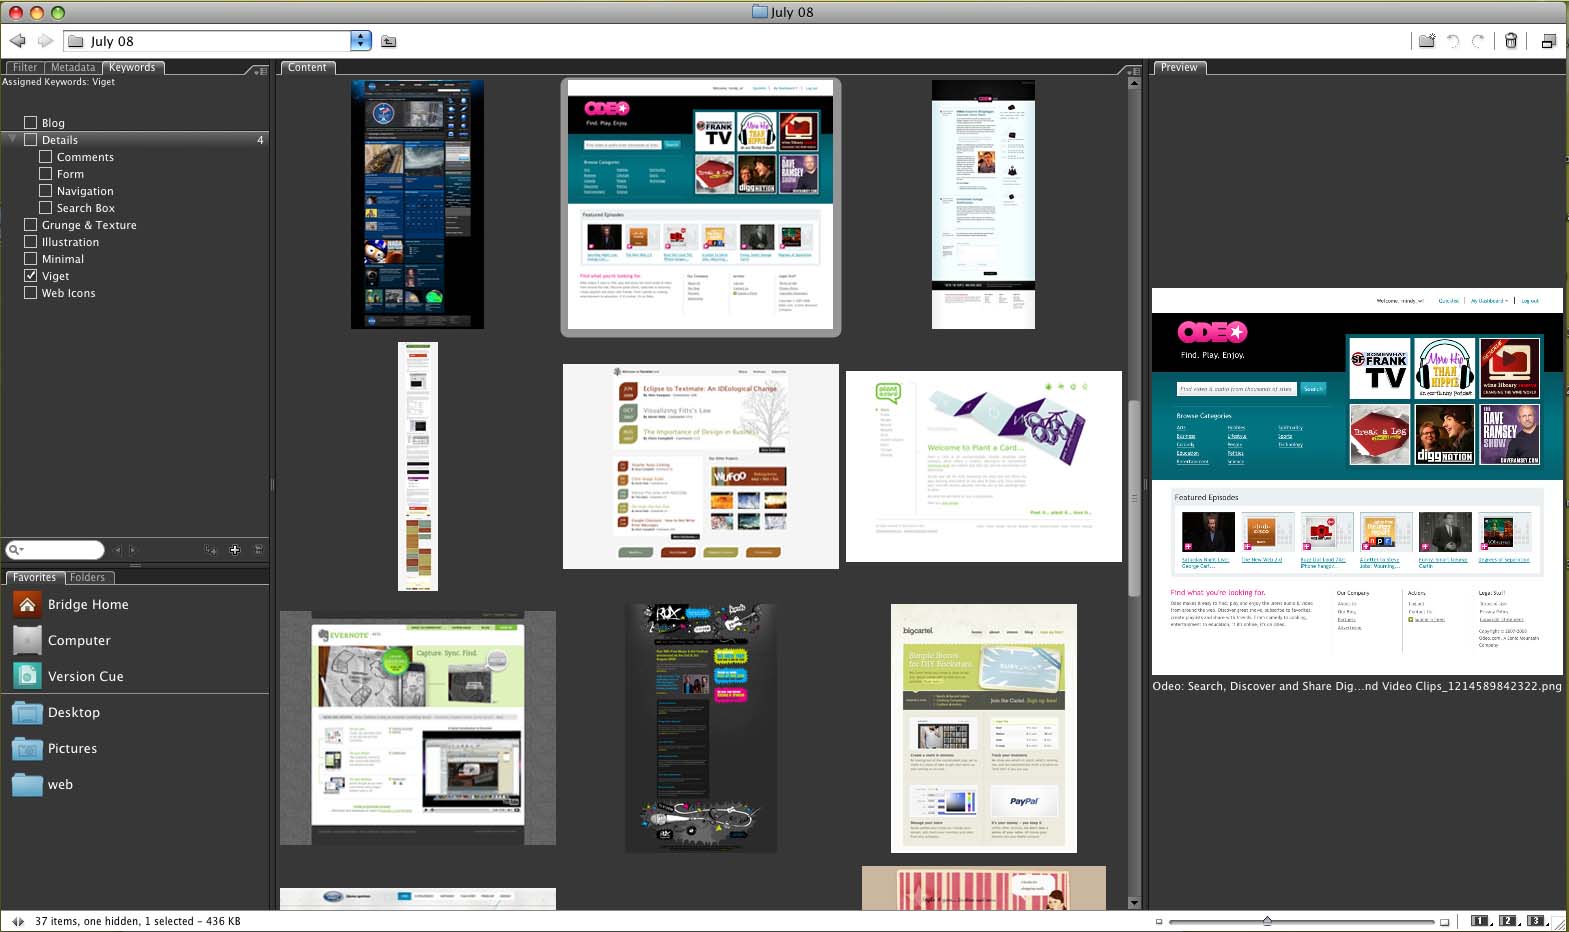
It's clutter-free for easy visual scanning. I'm a little obsessive-compulsive about keeping things minimal.
In the left sidebar I keep the Favorites and Folders panes. Filter lets you sort your files based on metadata (more on that later). You can put bookmarks to commonly-accessed folders and/or files in your Favorites panel -- I recommend doing this; saves tons of time. If you're looking for something outside of your bookmarks, Folders lets you browse your files the long way.

The center pane shows me a streamlined set of thumbnails, and to the right is my Preview window. I've saved this workspace as my default. You can have more than one custom workspace, and can easily toggle between them by clicking the 1/2/3 icons in the bottom right-hand corner of the screen:

Next to that you'll see a slider that lets you adjust the size of the thumbnails on the fly -- quite possibly my favorite feature. Hit Ctrl-T on your Mac to toggle filenames on and off in the thumbnail window for the cleanest look possible.
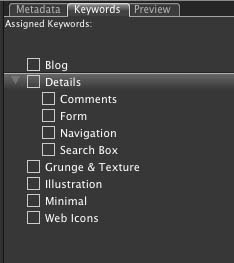
TAGGING WITH KEYWORDS
Adobe's Extensible Metadata Platform (XMP) is a labeling technology that allows you to embed metadata into the file right from Bridge. You can add color coding, star ratings similar to iTunes, and hierarchical keywords. I'm currently using keywords to tag my screenshots according to style and type (for example: "grunge" and "blog"). I'm also tagging my work by client and project name. I can easily jump in and filter the thumbnails I'm looking at by selecting these keywords. (Note: Some file types such as bitmap and gifs won't accept XMP metadata. Doh.)

BATCH PROCESSING
Photoshop's batch processing actions are available right in Bridge. So far, I have used it to rename files, resize files, and create automatic contact sheets. It's quicker to process things in Bridge than to fire up Photoshop if it isn't already running. You can find your batch actions by going to Tools>Photoshop>Batch. This will bring up the same dialog box you are used to getting in Photoshop.
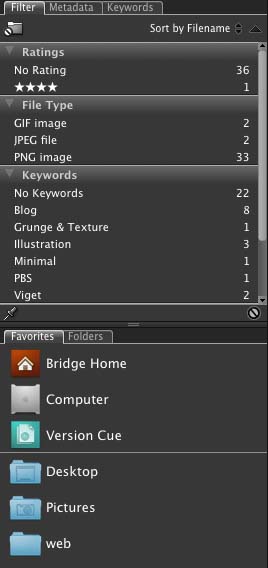
FILTERING, SNAPSHOTS
I can imagine all sorts of uses for filters, especially when you start to combine them. Here's an example that is somewhat random but saved me tons of time. We were building an icon library site for internal use and wanted snapshots of each icon set. I used Bridge's filters to weed out the 32x32 png files (instead of previewing the whole range of sizes and filetypes), and then used Mac's built in Ctrl-Shift-4 "snapshot selection" tool to grab a picture of each set in the thumbnail window on a white background. Worked great!
STACKING
Stacking is Bridge's way of grouping files. Stacks can be useful for visually collapsing things such as html files, icon sets, stock photos, or mockups with many revisions. Select multiple files and press Ctrl-G to create a stack. A bubble showing the number of files will appear in the top-left corner of your grouped files, and you can easily toggle them open by clicking it. If you want to change the top image in the stack, you can do so by rearranging the file order.

A word of warning: Don't bother stacking files you plan to move elsewhere on your hard drive or server. Bridge won't remember the stack info once the files move.
INTEGRATION AND COMPACT MODE
Here's where it all comes together. When working in an Adobe program such as Photoshop, Dreamweaver, or Flash, you can fire up Bridge right from the toolbar. Just look for the Bridge icon in the top right:
![]()
Hitting the Bridge icon will bring up the full window, which gets in the way. Luckily, you can throw it into "compact mode" so that it essentially becomes a small palette window that is easy to access but never in the way. Just click this icon, found at top right:
![]()
If that's not small enough for you, click the icon again to make it "ultra compact" -- it turns into a thin bar. Clicking the button one more time will toggle back to compact mode.

DEVICE CENTRAL
Bridge provides access to another oft-ignored Adobe product called Device Central CS3. Select a supported media format (such as an HTML file), select the "Test in Device Central" command, and see how the file should render on a wide range of mobile devices. Within the device profile you'll get a rendered visual skin and info such as download speed and formats are supported. I'm sure there are plenty of things yet to discover, but I'm definitely finding it useful.
Is anyone else out there using Bridge? If so, please share your tips!
I started using Bridge a few months ago and I don’t regret learning it. It’s more or less replaced Finder and Quick Look in my workflow.
If you’re managing photographs or screenshots, it’s nice to have fast access to the Camera Raw dialog (you can set it to open by default or just right/ctrl-click on an image) than you would through Photoshop if you want to do a quick crop or adjustment. It won’t replace Photoshop or Lightroom but the Raw dialog is great for fast, non-destructive adjustments.
The .ai and .eps previews are priceless, of course.
I also use the star ratings, but I’ve found it’s really only useful to mark favorites as 5 stars (slightly faster than a “favorite” tag) and things I’m thinking about deleting as 1 star and don’t use it for anything else. It takes too much thought personally to use anything in-between. I never go, “I only want to look at things that I ranked as ‘slightly above average’.”
Haha - good point Lee. Filter down to only my “eh, not the worst one in the bunch” stock photos.... not something you want to do very often.
I’ll have to try out the Camera Raw dialog. Thanks for the tip!
It looks like you’re using it for a collection of design snips, sorted by keywords...I’m totally doing that from now on.
Yep, Doug - that’s exactly what I’m doing. I took that snapshot early on in my use. I have LOTS of keywords now, including key words by color. Kinda like my own personal ScrnShots.
“I’ve been successfully ignoring it for quite a while...”
Me too!
But thanks for these excellent tips - I shall take more notice from now on.
I’ve been using Bridge CS2 for about 2 years now and just upgraded to CS3. I use it at my job to build newspaper pages in InDesign. I have all of the ads and editorial as PDFs for a particular page and just drag them all out on to the page at once. With CS3 you can now drag as many as you want and your cursor will change to a place image icon. You can then click exactly on the page where you want each image/advertisement/editorial/PDF to go.
I’ve always wondered what exactly Bridge was for, but never actually cracked it open myself. Thanks for introducing me to what looks like a wonderful tool!
I’m a web designer and I’d like to use it for grabbing inspirational screenshots of websites I admire. However, I can’t find a way to add a hyperlink to the screenshots within Bridge. Any suggestions?
Kyle - The easiest way I can think of would be to name the file using the url.
I was afraid of that. That would be far too much of a pain when compared to using delicious, scrnshots, designgrab, etc… I’ll keep looking and let you know if I find anything else.
Thanks for your help!
I like the application, and this is a good writeup. Here’s the problem with Adobe Bridge: it crashes. A lot.
The second most annoying problem is actually the same problem I’ve seen mentioned in the comments above - there isn’t any way to store meta-data.
The third big problem is that Adobe has built all of their stuff around “desktop” software. I want something that persists outside of the desktop. For example, we’re using dropbox.com for all of our asset management right now. It’s cumbersome, and very 1.0, but it works really well. A proper directory structure, a couple of text files, and we have a 25 person team cranking in hours.
Just a couple of thoughts.
I haven’t had a big problem with it crashing, but Viget has given me a nice speedy Mac so that may be why. It’s definitely not perfect, but it has it’s uses. We should all make suggestions for Bridge improvement over here:
http://dearadobe.com
DropBox doesn’t provide any type of image browsing, does it? Just file sharing?
In an idea world, we would all have access to high-end Digital Image Management software that stores boatloads of meta data, tells us when the image was last used, what client it was used for, etc. There are some great options out there, but the price tag is incredibly high.
@Mindy
Dropbox does provide image browsing. You have a Photos folder and any pictures or folders in there get turned into online image galleries. There is private sharing options, linking, etc. And these are things that are pretty well integrated into OS X via a right click menu that takes opens a browser and lets you change options, share them with friends, etc.
I am having trouble understanding or getting Bridge to link up with the actual files themselves. I have made changes in Lightroom and been able to link Lightroom with Bridge so my changes show up in Bridge as I make corrections. However, the changes show up in Bridge but do not show up in the actual files themselves on the hard drive. Is there a way to link the the files with the Bridge changes that occur?
I would strongly suggest not hijacking this thread for tech support issues. Contact Adobe: their support is excellent.
I’ve been using Alfresco with Drupal lately, and it’s been very interesting. A bit of work to set up, but I think I might be on to something for DMS. CIFS support makes it easy to work with the Alfresco backend, and you can publish out through Drupal.
Anyone had experience here?
I also had the same problem with bridge, i.e, my computer froze while I open photoshop CS2. I don’t know why this happens. please give me a solution if anybody know why it happened.
I like the idea of using it for viewing your screen shots of inspirational web site. I just don’t like using the amount of RAM it takes up just for doing that.
For now I get all the inspiration from the numerous CSS galleries on the web. I never thought of keeping screen shots of sites I liked.
I tend to just find the inspiration I need and then bookmarking (delicious) the sites I want to use for direct inspiration.
I am going to remove it tonight.
Next entry: Getting Moody: A Look at Inspiration and Style in Early Design Techniques
Previous entry: Is it time to ditch IE 6?

Recent Comments
Hi Doug!
I just want to print this article :) But the print version is yet to be fully polished. I hope you guys spend sometime :) Viget inspire is a really nice resource for me....
- Lance on 'What To Expect When You're Expecting CSS/HTML Handoff'.
- Erik Wallace on 'What To Expect When You're Expecting CSS/HTML Handoff'.
- Jonathan on 'Switching Mindsets: From WordPress to ExpressionEngine'.
Subscribe to Comments RSS