Building Motion for the Web: Recipes for Design Success


We explore how to borrow ideas from the animation industry, adapt them to the unique challenges of the web, and find the perfect balance between creativity and efficiency.
This article is part three of a series unpacking how we define and implement motion at Viget. The other articles in the Building Motion for the Web series are part one: In the 'Zone' and part two: Creating a Motion ‘Volume’ Scale.
In the previous article, we created a 5-tier framework to help dial in the right amount of motion for both planning and execution. In this post, we’re going to look at some process ideas to help us get straight to the business of building motion for the web.
Stealing Borrowing from Friends
At this point, we can assume that we’ve agreed to incorporate motion in the project. We may have determined what tier of motion we’re aiming for, but what does that process look like? How do we decide HOW something moves? What tools can we use for planning and communicating motion?
We can learn a lot from our friends in the animation industry; after all, they’ve been doing this for a long time! But we can’t just repeat what they’ve done and hope for success (unless we are, in fact, making an animated film). In the web industry, we have a few different challenges to face:
- Form: The final medium for motion on the web (code) is wholly separate from its concept mediums (sketches, 2D renderings, video).
- Time: We measure project timelines in weeks and months, not years.
- Control: We’re not always in control of the flow—the user has input on where they go and what they want to see.
This leads to an additional set of goals when looking at creating our process for building motion on the web:
- Form: We must, at some point, convert motion into code.
- Time: We need to be as efficient as possible to hit our deadlines.
- Control: We need to build systems and series of interactions rather than linear flows.
Why don’t we just start with code then? Well, we could… but that’s slow. Especially if we have to change direction. Solving our 1st problem (form) right away hurts our 2nd problem (time). We want to wait to convert to code until we have everyone’s buy-in on the motion concept.
So how do we get buy-in as quickly as we can? We do it by fine-tuning our motion design deliverables to target the minimum feasible fidelity for concept buy-in. Then we move to a tight feedback loop between designers and developers that allow for system-level integration of the project’s motion concepts.
We could sum it up like this:
- Start as loose (low-fidelity) as feasible.
- Stop at the minimal level of fidelity needed to achieve buy-in with all stakeholders.
- Move into code as soon as we can.
And if you have a soft spot for diagrams, as we do, it might look like this:

We’ve taken some design process tools from our animation industry friends and supplied a few of our own. You’ll see that we’ve organized them into tiers of fidelity, discussed their strengths and weaknesses, and then assigned each an efficiency score—because who doesn’t love a good rating?
Low Fidelity
These are our go-to’s, our heavy hitters. With the following two artifacts, we can communicate large amounts of information quickly and efficiently.
Descriptor Pairing
One of the quickest ways to define something is to use descriptive adjectives. With 3 words we can create a ‘feeling’ of how things should behave while moving. This is an artifact we recommend no matter what stage of the process we’re starting at because of how much it informs the ‘feel’ of the system we’re creating.
If we want the motion to be “soft, bouncy, and joyful”, this could present as slow movements with a slight squish, like rubber or a beach ball. It could also have elements that rotate around each other, conveying joy or happiness.
We use 3 categories of adjectives to help describe motion:
- Speed: the length and characteristic of the motion.
- Weight: the feel of the imaginary ‘materials’ used.
- Feeling: additional emotive characteristics.
Here are some examples of how they might translate:
| Speed | Weight | Feeling |
|---|---|---|
| Snappy (Slow acceleration, sharp deceleration, like ‘clicking’ into place) | Heavy (No bounce, slow to get in motion) | Joyful (Circular movement, rotating elements, bursts) |
| Deliberate (No meandering, moving directly to the intended area, consistent speed) | Elegant (Additional flourishes) | Intense (Larger movements, big changes) |
| Technical/Cold (Slow, calculated, many elements moving into perfect position) | Light (Quick to accelerate, slow to stop) | Reliable (Consistent, repeatable movement patterns) |
| Soft (Smooth transitions, slow acceleration and deceleration) | Bouncy (Springs off other elements, slight squish to movement patterns) | Aggressive (Fast, things slam into place) |
| Fast (Quick durations) | Springy (Animations have anticipatory movement, bounce on stop) | |
| Responsive (Little-to-no delay in response) | Hard (No deformations, rigid bounces) |
Efficiency Score: 🟡🟡🟡🟡🟡 (5/5)
Strengths: Conveys a lot of information in very little time, excellent for setting guidelines for motion systems.
Risks: Without context, descriptors can become vague or have alternate interpretations.
Motion Inventory
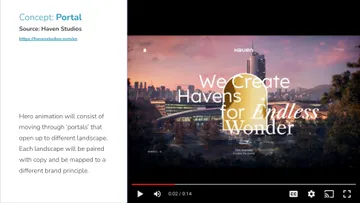
Motion can be hard to visualize. We can make it easier by giving people something to REACT to. This borrows its format from Dan Mall’s Visual Inventory, and consists of:
- Grabbing live examples of motion from the wild as video screen recordings.
- Documenting what parts of the motion example we’d keep and what we’d change.
- Presenting the live example and narrative together
- Discuss!
Straightforward, right? This is a great way to grab early feedback, especially if there’s a particular pattern that we can illustrate through a live example.
Efficiency Score: 🟡🟡🟡🟡🟡 (5/5)
Strengths: Gives something tangible to react to and can illustrate a complicated concept quickly.
Risks: If the example is too far of a jump from the intended goal or stakeholders can’t see themselves in the work, you may lose people on the way, making it harder to achieve buy-in.
Medium Fidelity
Sometimes all we need are a few descriptors and a motion inventory and we’re ready to jam. Often, if a motion pattern is more complex we will need to work through sequencing and timing. These next two artifacts can help us with that.
Storyboard
Storyboards are a series of still images arranged in a sequence that show how a motion pattern progresses over time.
Unlike traditional storyboards, a web motion storyboard will be short and focus on key interactions or elements rather than ‘scenes’ or a linear flow. We can use them to show screen transitions, the sequence of a set-piece hero animation, or even how the navigation should respond to interaction.
This is our most recommended next jump in fidelity as storyboards can be made with the same tools already being used to craft the design of the final product.


Efficiency Score: 🟡🟡🟡🟡⚫ (4/5)
Strengths: High re-use of design elements, allows sequencing to be expressed. Doesn’t require any specialist tools or knowledge to produce.
Risks: Meant to be used for coarse sequencing, not finely controlled timings. Storyboards can become overwrought if too much timing information is included. For a higher level of control, use an animatic instead.
Animatic
If we need more timing information than a storyboard can convey, we can create an animatic. This is a technique from traditional animation where a sequence of still images are given timing and motion cues in a video format and laid on top of an audio track. This gives us a sense of whether the motion ‘works’ without fully committing to a concept.
The main difference with a web animatic is that there isn’t usually an audio track, but they are still valuable to test timing cues and overall speed.
Efficiency Score: 🟡🟡🟡⚫⚫ (3/5)
Strengths: Effectively communicates timing on more complex interactions and allows quick adjustments.
Risks: Producing these typically requires separate programs, each with their own learning curve. The speed of producing these will depend on the team’s familiarity and avoiding the temptation to polish these into full video prototypes (which we’ll talk about here in a bit…)
High Fidelity
We tend to discourage spending too much time with these next few artifacts (with the exception of code prototypes, which we’ll talk about in a moment) because they’re slow to produce. Sometimes though, simply nothing else will do. Use these with caution and only when you absolutely must nail down the specifics of an interaction to achieve buy-in.
Style Frames
This is our first stop on the high-fidelity train. This technique involves taking key frames from the motion concept and rendering them as high-fidelity stills. This is helpful when trying to nail down a visual treatment.

Efficiency Score: 🟡🟡🟡⚫⚫ (3/5)
Strengths: Can very quickly convey the final visual style of an interaction.
Risks: Because these deal mostly with style, it can be a wasted effort if visual style is not the main type of feedback we’re looking for.
Video Prototypes
Next up is using software (we like Figma for basic things, but often turn to ProtoPie or Principle) to simulate the intended movement/interaction of the final product. All the tweening, timing, and interaction are produced by the software and are typically exported as a video that can be shared.
While this method can produce some stellar results, it has some major drawbacks. Everything will have to be re-implemented in code. Furthermore, some programs allow transformations and effects that, while fine for motion graphics, are hard to reproduce in code.
Efficiency Score: 🟡🟡⚫⚫⚫ (2/5)
Strengths: Mature and powerful tools allow fine-grained control over every aspect of the motion, leading to a complete picture of the motion concept.
Risks: These prototypes can be time-consuming to produce, will have to be re-implemented, and can create unintentional complications in implementation.
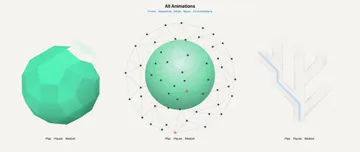
Code Prototypes
Code prototypes are an isolated code implementation of a motion pattern. Typically hosted at a temporary URL through a service like Netlify or Vercel, these allow experimentation with the tools and techniques that will be used in the final product.
There are two types of code prototypes that seek to answer different questions. Feasibility prototypes seek to answer, “Is this possible?”, which lends itself to a rougher, more disposable form. Implementation prototypes ask, “How will this be implemented?” which creates a more polished prototype with reusable code, often suitable for sharing with stakeholders.
A code prototype gives the best sense of how the final product will function as reviewers will be able to experience it through its final medium: the browser. It is not, however, as nimble in exploration as our other artifacts. Changes take longer to make, which means this is more effective once we have more definition on where we’re trying to go.
Efficiency Score: 🟡🟡🟡🟠🟠 (3/5 but 5/5 with caveat)
(🟠🟠 Caveat: If we’re using a code prototype in an Iterative Motion Jam, then the efficiency greatly improves.)
Strengths: We bridge the gap between idea and execution by moving into code, usually the code can be reused in the final product.
Risks: If too isolated from the project it can create hurdles to implementation. It can be slow to do large pivots in direction as well, so doing this too early can be inefficient, especially if attempting to produce a prototype that can be reviewed by stakeholders.
Introducing: Iterative Motion Jams
Now that we’ve achieved buy-in, we move to the meat-and-potatoes (or beans-and-rice if you’re vegetarian) of our process. The core of this phase is tight feedback loops between the designer and developer in a closed environment.
This can happen in real-time, similar to pair programming, or asynchronously through a tinker-then-talk iterative cycle. And no, a closed environment doesn’t mean that we lock folks in the basement. It means that the feedback loop is restricted directly to the designers and developers working on the project. This reduces the risk of experimentation and lets the team jam on feel, timing, and flow in real-time rather than passing around and interpreting artifacts. The earlier we can move into this phase, the more efficient our process will become.
This type of interaction requires some groundwork. Dropping a team with no rapport into a jam will make it hard to produce the spark that we’re looking for. That’s why at Viget we rotate through 15-minute personal Labshares every week, set aside time each year to explore interesting ideas, run regular design/development cross-team discussions, and come all together as a group 4 times a year. Magic is not something that happens overnight — it’s a constant, collective, culture-conscious cultivation effort made up of thousands of small touches. By the time the jam happens, the familiarity, the culture, and social touchpoints will grease the wheels of the idea engine, sparking the magic.
These jams will naturally produce work that can be used to solicit final buy-in similar to what we’d get with an isolated code prototype but there are a few differences between a jam and a code prototype:
- Integration: A code prototype is usually isolated, a jam can take place as fully-integrated with the final product.
- Audience: A prototype is mainly meant for external buy-in or feasibility testing, a jam is a closed collaborative session aiming towards the final product.
Always An Exception
There is one type of motion that isn’t subject to our form-gap issue: runtime animations. This is the pattern used by Rive and Lottie where animations are created in an app (Rive has its own fantastic editor, and Lottie can use After Effects or its newly launched standalone editor) and exported as a data file. Specialized JavaScript libraries, called ‘runtimes’, can then directly load the data files for use in the browser.
This pattern excels for individual animated elements or creating interactive elements like interactive characters. In the case of Rive, there’s a powerful state machine that allows greater control of interactivity that we find quite exciting. My fellow UI Developer Nathan Schmidt wrote about his exploratory dive into Rive.
Closing Thoughts
To wrap it up, creating web motion is a little like cooking – it requires patience, the right ingredients, and a dash of collaboration. Spending too much time planning can leave your process overcooked. Once you've got the recipe right, gather your team, jam together, and make some web motion magic happen — let's get moving!