Testing Google Analytics with PhantomJS
Nate Hunzaker, Former Development Director
Article Category:
Posted on
Updates
I've updated this post to work with the latest version of Viget.com
Google Analytics is a great tool for tracking events happening on your website. Yet ensuring that correct information is being recorded can be a tedious task. For my most recent engagement I needed to add analytics support to a large number of pages with challengingly different environments. There was a constant worry that some rules would collide with others or not fire correctly when juxtaposed with existing scripts.
Navigating page-by-page to ensure stability can provide solid verification that code is working properly. However, when working with a nontrivial amount of pages, manually conducting this work is time-consuming and daunting.
Cue PhantomJS, a headless WebKit browser designed for page automation and browser-based JavaScript testing. When coupled with SinonJS spies and the Mocha testing framework the difference between testing a single page and twenty at a time became marginal.
I'd like to go over these technologies in detail and provide a basic tutorial of our methodology.
What is a headless browser?
PhantomJS runs without a graphical interface. It can navigate as if it were Google Chrome or Safari without actually having to open a window. This is a great boon to JavaScript testing as it provides quick access to a browser-based environment with a simple API to automate page navigation and JavaScript interaction.
var page = require("webpage").create();

page.open("http://google.com");

page.onError = function(e) {
  console.log("Something went horribly wrong!", e);
};
SinonJS
SinonJS is a testing library that provides access to spies in JavaScript testing. Spies can track activity surrounding targeted bits of code. They help to verify that the correct methods are being called and if they behaved as expected.
When testing we'll trigger an event that activates Google Analytics and use a spy to see if the correct method was fired. We'll also use them to confirm that the correct parameters were pushed up to Google Analytics, which will provide some additional comfort that cross-pollution between events is not occuring.
var spy = sinon.spy(_gaq, "push");

_gaq.push(['_trackEvent', 'Header Links', 'Click']);

console.log(spy.called) // => true
Later in this article we'll delve deeper into Mocha, creating some more tests and integrate a custom test reporter that will help us to communicate the results back to PhantomJS.
Digging in to the code
I have hosted the final result of this article on Github. I am working with the following file structure:
.
├── lib
│   ├── jquery.js
│   ├── mocha.js
│   └── sinon.js
├── src
│   ├── reporter.js
│   └── rules.js
├── test-runner.js
└── tests
    └── home-test.js
- Direct link to mocha.js
- Direct link to sinon.js
- Direct link to jquery.js
- Direct link to src/reporter.js
Building the sample rules
First we need to add some events to the page that we want to track. We'll add a couple of rules to the homepage to track some of the various activities on the site. We're also pull in jQuery to make our scripts easier to write.
// src/rules.js
(function($) {

    // Track clicks on outbound links
    $("body").delegate("a", "click", function(e) {
        if (this.hostname === 'viget.com') return;

        e.preventDefault();

        _gaq.push([
            '_trackEvent', 'Outbound Links', 'Click', this.textContent.trim()
        ]);

        setTimeout(function(url) {
            document.location = url;
        }, 100, this.href);
    });

    // Track clicks on the news items section
    $("a.footer__newsletter__hdr").click(function(e) {
        e.preventDefault();

        _gaq.push(['_trackEvent', 'Newsletter']);

        setTimeout(function(url) {
            document.location = url;
        }, 100, this.href);
    });

    // Tracks links to careers
    $("a[href*=careers]").click(function(e) {
        e.preventDefault();

        _gaq.push(['_trackEvent', 'Careers', 'Click Link']);

        setTimeout(function(url) {
            document.location = url;
        }, 100, this.href);
    });

}(window.jQuery));
Pretty straightforward. Remember that we need to delay the link so that Google Analytics has enough time to setup before the browser navigates to a new page.
Lines 3-18: Whenever an outbound link is clicked, track it.
Lines 20-34: When a news item is clicked, pull some out some data and track it.
Lines 36-47: When a link to our careers section is clicked, track it.
Creating the tests
Now that we know what we want to track, let's build a test that evaluates if we were successful:
// tests/home.test.js
describe("Viget Home Test", function() {
    var spy;
    var assert = sinon.assert;

    beforeEach(function() {
        spy = sinon.spy(window._gaq, "push");
    });

    afterEach(function() {
        spy.restore();
    });

    it ("tracks outbound links", function() {
      $("a.twitter").click();

      assert.called(spy);
      assert.calledWith(spy, [
          '_trackEvent', 'Outbound Links', 'Click', 'Twitter'
      ]);
    });

    it ("tracks clicks on the newsletter", function() {
      $(".footer__newsletter__hdr").click()

        assert.called(spy);
        assert.calledWith(spy, ['_trackEvent', 'Newsletter']);
    });

    it ("tracks clicks on careers links", function() {
        $("a[href*=careers]").click()

        assert.called(spy);
        assert.calledWith(spy, [
            '_trackEvent', 'Careers', 'Click Link'
        ]);
    });

});
In the code above, we generate a suite of tests for the Viget homepage. Here's what's going on:
Line 3: An empty variable for our spy. At the beginning of each test this spy will be regenerated so we need to provide a variable with this level of scope here.
Line 4: The assertion library used for testing the results. This is a set of functions provided by SinonJS.
Lines 6-9: Before each test a spy is generated to monitor activity around _gaq.push(). This spy is reset for each test so that it has a fresh copy to work with.
Lines 11-50: The tests. JavaScript is used to replicate the interaction we wish to track and assertions are executed to determine the activity around the push method of _gaq. A check is also made to confirm it was called with the correct arguments.
The Custom Reporter
Now that tests have been created a method of communicating the results back to PhantomJS need to be added. With Mocha this is done through reporters, which listen to activities that occur during the testing process and provide feedback to the tester.
Reporters involve a lot of framework specific code that isn't completely relevent to this article so I've included this reporter in the following Github Gist. For those of you interested in learning more about Mocha, reporters are a really cool part of the framework and I would encourage you to dig deeper into them.
Building the PhantomJS test runner
If you don't have PhantomJS installed there's an excellent guide on their website. You'll want to make sure that you have the latest version (1.7 at the publication of this article) as more recent versions of PhantomJS have a new method of communicating between the page and PhantomJS that we use in our reporter.
Personally, I installed it using Homebrew:
brew install phantomjs
The following code will be used to run our tests:
var page = require("webpage").create();

page.open("https://www.viget.com", function(status) {

    if (status !== 'success') {
        console.error("Failed to open", page.frameUrl);
        phantom.exit();
    }

    page.injectJs("lib/mocha.js");
    page.injectJs("lib/sinon.js");
    page.injectJs("lib/jquery.js");

    page.injectJs("src/reporter.js");
    page.injectJs("src/rules.js");

    page.injectJs("tests/home-test.js");

    page.evaluate(function() {
        // Undefine GA
	window._gat = undefined;
        window._gaq = [['_setAccount', 'UA-00000000-1']];

        // Run tests
        window.mocha.run();
    });

});

page.onCallback = function(data) {
    data.message && console.log(data.message);
    data.exit && phantom.exit();
};
This is a lot to take in all at once. Thinking in terms of regular browser use, here's what happens:
Line 1: Create a new tab.
Line 3: Navigate to https://www.viget.com
Lines 5-8: Could we successfully connect? If not, notify the user and exit PhantomJS
Lines 10-16: Add the JavaScript that runs our tests to the page
Lines 18-26: page.evaluate lets us run JavaScript on the current page. Here we unset the current Google Analytics setup so that we don't accidentally push our results. Once this has all been configured, we run our tests on line 26.
Lines 30-33: PhantomJS 1.6 added the ability to send messages from the client back to PhantomJS. This activity can be seen within the log function of the custom test reporter. Here we define a function to handle the event that is fired when this method is envoked.
Give it a spin
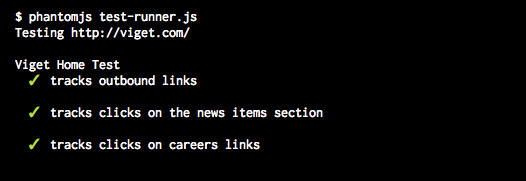
With all of this complete testing can begin. Use the following command to test the rules we've created:
phantomjs test-runner.js
You should see the following output:
Take aways from PhantomJS testing
I found that testing Google Analytics in this way is significantly faster and provides continuous confirmation that events are behaving as expected. Given the sheer volume of pages you are able to test, refactoring can be done safely. Reproducing and testing fringe issues also becomes much easier.
The code for this article was simplified for brevity, however JavaScript remains at its core. Modification should be straightforward and I encourage you to use this code in other forms of front-end testing. These methodologies provide exciting opportunities for advancing the quality of tests for JavaScript applications and demonstrate the leaps the community has made to advance JavaScript as a language in the past few years.