How to Host a Hardware Happy Hour

Dave Scherler, Former Senior User Experience Designer
Article Categories:
Posted on
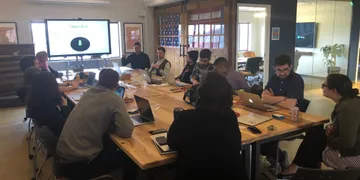
Last spring, Shaan and I hosted a hardware workshop to introduce other Vigets to the wide world of Arduino and share our love of hardware prototyping. Drinks were enjoyed, circuits were built, and LEDs were blinked. You might say it was very #lit.
If They Build It They Will Learn
Even though Viget has hardware expertise and a portfolio of fun and interesting projects, not everyone in the company has been exposed to open source electronics platforms. In the spirit of knowledge sharing, we set out to talk a bit about the basics of circuit building, provide an overview of the Arduino platform, and demonstrate how to get started prototyping projects.
Our goal was to get others energized about hardware possibilities so we made this workshop as hands on as possible - meaning plugging jumper wires into breadboards and writing real code by the end of the night. Our team built a simple circuit that could detect motion and flash as series of LEDs. If you’re interested in hosting a similar event, here’s how we went about it and a few tips for making it a successful workshop.
Make it Easy to Attend
We we sent out a survey to the entire office to gauge interest and identify a time and day that would work best. We settled on doing it outside of working hours so folks wouldn’t have to cut into time for client work.
Bring the Snacks
We ordered a few pizzas and had cold beverages on hand as well. Pro tip: if for whatever reason you need a method for quickly dividing attendees into two groups, kill two birds with one stone by ordering a Hawaiian Pizza. There are two kinds of people: those who believe pineapple is both an acceptable and delicious topping, and people who are actual monsters. Viget was kind enough to stake our provisions but if that’s not an option, I think a few easy snacks would do the trick.
Know Your Audience
One of the added benefits of surveying for times was knowing who was planning to attend. We were excited to see interest from a wide range of roles: Project Managers, UX Designers, Front-End Developers, Back-end Developers, and Copywriters. Nearly all Viget teams were represented! This information gave us some insight into the group’s working knowledge and helped us structure the content of the workshop accordingly.
Keep it 💯 101
Looking back, structuring the content was probably the most challenging part of the workshop. Shaan and I went back and forth on how much detail to provide and found ourselves constantly revising our deck. Should we cover board basics like IO pins and what they do: definitely; Should we discuss the value of data sheets and how to read them: no, not this time. Should we talk about serial communication and debugging practices: I don’t know, maybe?
As enthusiasts, all these things are important and deciding which to include and which to cut was difficult. Giving ourselves a constraint of two hours and prioritizing accordingly was helpful – we decided to use at little more than half of our time building circuits and writing code. This helped refocus the workshop on what newbies would need to know to build the project we had in mind. What resulted as a lean and mean presentation centered around Arduino board pinouts, the essential elements of every sketch, and how electricity flows through a circuit.
Here’s how we structured our workshop:
- Arduino Platform Overview and History
- Examples of Arduino-powered things
- Microcontrollers and Why They’re Easy to Work With
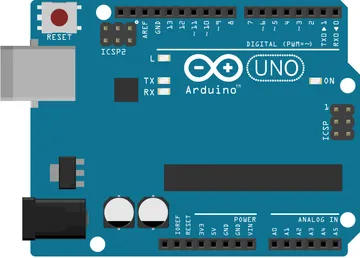
- Arduino Uno GPIO and Power Pins
- Arduino Integrated Development Environment (IDE) Overview
- Elements of a Sketch
- Electronics Basics and Analogies for Voltage, Current and Resistance
- Resources for Learning More
- Tonight’s Build Overview
- Parts Needed and How to Use Them
- Circuit Schematic
- Group Coding
Here’s what we found worked well and some things we'd do differently.
Build and Document the Project in Advance
This goes without saying but if you’re planning on demonstrating or building any kind of project live, make sure you’ve already built the thing yourself. Practicing the build can help identify unconventional sketch patterns, eliminate unnecessary steps, and understand wiring connections that might be confusing to first timers, all things that can trip you up when it comes time instruct and guide others.
Even though Shaan and I took care to prototype all iterations of the project build, we still uncovered missing steps when doing the build live, like, forgetting to explain the terminal and power strips on a breadboard. This was a step that didn’t occur to us to document at the time, but we should have.
Make Example Code Easy to Read
Even if your group has experience with writing code I would suspect the Arduino IDE and programming language will present a little bit of a learning curve. So give functions meaningful names, add comments to every line of code and write out the word “variable” every time you define one. We learned that when it came to writing example code, it’s best to be verbose, even to a fault. This is especially true when working with novice coders.
Easy on Theory, Heavy on Examples
If you take a look at the deck, you’ll see we kept the background information short and sweet. The group was attentive throughout and successful once we got to the build, so I think we did strike the right fidelity of information. We didn’t include many examples outside of the ones necessary for the build, but I think the group could have benefited from more examples of sketches and how to wire different components together.
Have Ways to Increase Difficulty Fun
Our build was pretty simple: blink an LED on and off every other second. We knew everyone would be able to get this down pretty quickly. The next build included three LEDs and blinking them one after another in a chase sequence. The last build challenged everyone to incorporate a vibration sensor into their circuit and get the LED to blink when motion was sensed. I think it’s important that we didn’t treat each build as successive tasks during the workshop. Shaan and I didn’t want people to think or feel like they “didn’t get as far” or “finish the assignment.” We just framed as other ways to explore a simple circuit.
Reserve Plenty of Time for Pairing
Make sure the time you set aside for the build include lots of time to make yourself available to help others with questions. And as you might imagine, this ended up being the most rewarding experience of the workshop. Helping others learn and seeing them immediately build a project together was so much fun. There’s also that incomparable feeling you get when sharing a passion with others. So make sure there’s enough time for this important part!
Final Thoughts
If you work in the digital or creative space, I think it’s likely you or your team has an interest in building Arduino-based projects and tinkering with electronics. Regardless of the industry you're in, trying out new technology can be a powerful experience - you learn something new, better understand the gadgets we're surrounded by, and are reminded that everyone starts learning at the beginning.
Next time you plan a happy hour, I hope you consider making it a hardware happy hour. Be sure to let me know if you do by tweeting at me or commenting on this post. I’ve listed a number of resources to help you get started below and as always, if you have questions or want to learn more about the hardware work we do here, be sure to contact us here. Happy breadboarding!
Resources
Deck
Hardware Used
- Arduino Uno Rev3
- 1 breadboard
- USB-B Cable
- 3 LEDs
- 3 1kΩ Resistors
- 10 jumper wires
- 1 vibration sensor
Starter Kits
- Arduino Uno Rev3 ($22, board only) This is board we used.
- Sparkfun Tinker Kit ($49.95, includes Arduino Uno Rev3)
- Arduino Starter Kit ($87) from Arduino.cc
Helpful Sites