Create Rive-ting Animations

Rive reduces the time it takes to make complex animation, making some motion items easier and faster to build.
Rive lets you build interactive animation in <canvas> using a web application UI. What was intriguing to me about Rive is it allows you to build state machines like hover, click, and mouse movement within the application, by dragging states and setting options in the application UI. This allows you to build interactive <canvas> animations without being an expert in canvas or JS animation.
Rive has been getting a lot of attention over the last year. Figma's highly interactive homepage uses Rive and the founder of Lottie joined Rive in the fall. So, I decided to do a bit of exploration of Rive to see how it worked.
There are two main things I wanted to learn:
How easy it is to build and work with Rive’s State Machine (hover/click). Could I build complex interactive animations with minimal JS?
How to interact with the animation from external sources such as buttons or scroll triggers.
Animation Made Easy
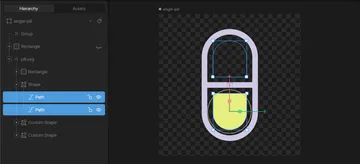
For the start of my investigation, I decided to build something just to get a feel for the program. For our AI Healthcare Exploration, we needed to create a simple animation of a rotating pill. I was able to export the SVG from Figma and import it directly into Rive. I then created a mask inside of the pill so that I could move the “liquid” of the pill as it rotated. I created two timelines, one for hover and one for click. On hover, the pill pulses larger and smaller. On click, the pill does a little wiggle and shake.
Rive feels very intuitive to use and quite similar to working in After Effects or even Flash. At first, animating took some time, as I had to dust off my old Flash animation skills. But once I got the hang of it, building the animation went pretty quickly.
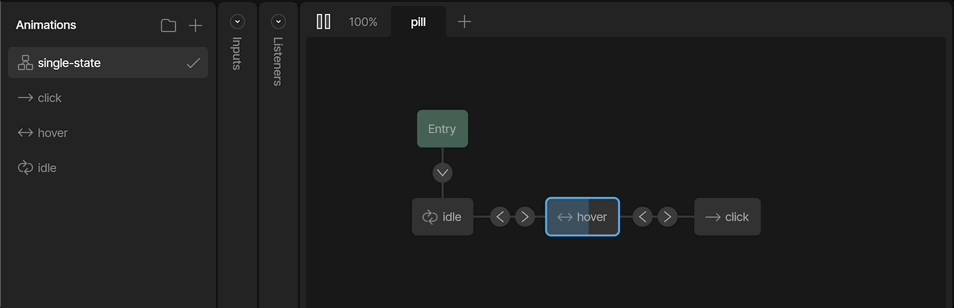
To build out the State Machine, you set up the timelines you want to use and then set the inputs and listeners (hover/click) to go in between the timelines.
Once I had the animation all set up, I downloaded the Rive .riv file and added the canvas HTML and JS to my project. I was pleased that Rive has a JS/WASM runtime which allows you to play the animation in the browser with very little code.
// See CodeSandbox for the full code ↑

// In HTML
<canvas id="pill" width="40" height="40"></canvas>

// JS code to play the animation, all the rest of the logic is done in Rive
const singlePill = new rive.Rive({
  src: "./src/pill.riv",
  canvas: document.getElementById("pill"),
  artboard: "single-pill",
  autoplay: true,
  stateMachines: "single-state",
  onLoad: () => {
    singlePill.resizeDrawingSurfaceToCanvas();
  },
});
Nested Artboards
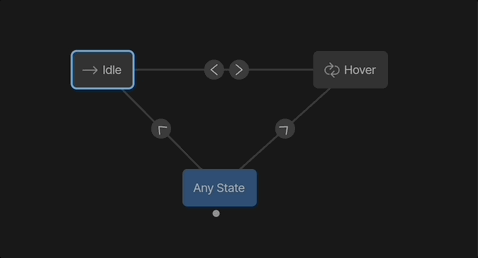
I then took the pill animation one step further and generated a group of pills. For that, I nested the single pill artboard on another parent artboard. The benefit is that you can build multiple small animations and combine them into larger ones. But I ran into a challenge: getting the State Machines to work on the nested artboards when a user interacts with the parent art board.
With nested boards, the child board is waiting to go into Entry but is never fired because it is on the parent board. It took me a minute to figure out, but the solution is: for your child board, instead of having the State Machine start at Entry, have it start at Any State. This allows the nested board to move into the State Machine for any state set by the parent board. Nothing needs to change in the standard JS runtime script.
External Interaction
My next exploration was to hook up external buttons to play different timelines in Rive. This was way easier than I thought! Instead of hooking up inputs, listeners, and timelines together in Rive, I set the starting timeline to play the Rive animation — and then all the pause/play is done in JS.
In the JS, I set up the default Rive runtime code. Then I get the external button(s), by the element id. When a user clicks the button, it gets the Rive instance and figures out what animation is currently playing.
// JS that changes the Rive animation - See CodeSandbox for the full JS code ↑

pedal.onclick = () => bikeButtons.playingAnimationNames.includes("pedal")
   ? bikeButtons.pause("pedal")
   : bikeButtons.play("pedal");

frontWheel.onclick = () => bikeButtons.playingAnimationNames.includes("front_wheel")
   ? bikeButtons.pause("front_wheel")
   : bikeButtons.play("front_wheel");

backWheel.onclick = () => bikeButtons.playingAnimationNames.includes("back_wheel")
  ? bikeButtons.pause("back_wheel")
  : bikeButtons.play("back_wheel");
If you want to update a Rive input (e.g., incrementing a Rive input number by 1 on each click), you have to access the Rive stateMachineInputs. I tested this out by updating the Rive input when a user scrolls on the page so that, as the user scrolls, it updates the number input and moves the animation.
I set up a number input in Rive and blended the start and stop timelines. In the JS I set up an addEventListener for when a user scrolls. This calls the function moveBike which gets the user’s scroll position, calculates it to a percentage, and updates the Rive scrollInputs.
One thing to remember is that stateMachineInputs is an object (see the docs), so if there is more than one input then we need to do something like bike.find(e => e.name === 'scroll');
If this was going to be used in production, I would probably hook it into something like GSAP scrolltrigger to start the scroll animation when it got into view.
// See CodeSandbox for the full JS code ↑

function moveBike() {
  const scrollInputs = bike.stateMachineInputs("bike_scroll");
  const documentWrapper = document.documentElement;
  const pos = documentWrapper.scrollTop;
  const calcHeight = documentWrapper.scrollHeight - documentWrapper.clientHeight;
  const scrollValue = Math.round((pos * 100) / calcHeight);

  scrollInputs[0].value = scrollValue; //using [0] as we only have one input in Rive
}

//adjust the throttle to get the desired performance and look
window.document.addEventListener("scroll", throttle(moveBike, 10));
For Designers and Developers
Going from motion design to development can be an elaborate, time-consuming process, as the designer creates a range of motion comps, from simple mock-ups to high-fidelity motion comps. Then, all the design and motion needs to be rebuilt on the site in code. This can be quite time-consuming, both from a design perspective and development (even moreso). If you are interested in our motion process at Viget, see Building Motion for the Web, Part 3, which explains our workflows in-depth.
Rive makes it easier to create animations, sometimes even enabling the designer to craft a full animation that the developer just has to implement on the page. Rive also reduces the time it takes to make complex animation, making some motion items easier and faster to build.
I have enjoyed exploring Rive and seeing the possibilities it has to offer. Using the State Machine is very simple and intuitive. Hooking up Rive with external buttons and input is more time-consuming, but relatively easy with Rive’s JS/WASM. I will be reaching for Rive the next time I add motion to a site!
Give the mouse the gouda stuff!