Building a Magical Brooch for the Kentucky Derby, NBC, and Johnny Weir

Justin Sinichko, Former Hardware Developer
Article Categories:
Posted on
We created the first-ever Twitter-powered brooch for this year's Kentucky Derby. Curious how we made it? Read more.
A collaborative effort between NBC Sports & Viget, Johnny Weir’s social brooch was a stand-out social media success at the 142nd Annual Kentucky Derby. Weir, two-time Olympic figure skater and NBC Olympic analyst and personality, wore the Twitter-powered brooch while it galloped on top of visual effects whenever #WatchMeNeighNeigh was mentioned. Shortly after his first appearance on the NBC broadcast #WatchMeNeighNeigh was trending on Twitter and Lawrence, the stallion on the brooch, was off to the races.
Johnny Weir’s social brooch made an appearance throughout the live broadcast as well as a few comical social videos with Bob Costas. The brooch was an integral part of NBC Sports social strategy for the Kentucky Derby and performed flawlessly. An estimated 16 million viewers had the opportunity to see and interact with the brooch. I had the pleasure of designing, engineering and accompanying the brooch to the Kentucky Derby.
Interested in how it came to life? Let’s dive into a world of 3D printing, IoT, crafts and the hand-craft that made this hardware stunt a success.
A brooch that gallops
We landed on an idea for a horse-shaped brooch with animated legs that galloped. To everyone’s surprise this was a motion I was familiar with. A number of years back I worked a ranch in Colorado and regularly competed in rodeos.
Though we ultimately backed away from double-articulated legs (the linear mechanics involved to perfectly nail it were too complex for the project’s small scale) we found that combining the legs with a slight head bob were plenty convincing.
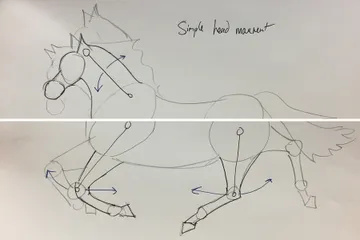
I spent a few short hours on paper before moving to CAD and digging into the design. A galloping brooch sounded pretty neat but the scale was just so small that we didn’t know if our concepts were actually feasible. The final brooch needed to be about 3.5” (8.89cm) wide and as thin and light as possible.
Using Fusion 360, I began by approximating the shape of a horse and working out key motion paths for the legs, head, and tail. During these early steps I took care to design and constrain each component of the model so it could be altered later. This type of changeability is most easily accomplished using parametric modeling -- something that is as much a feature of some CAD utilities as it is a design methodology. Parametric modeling, paired with rapid prototyping technologies, facilitate quick design iterations.
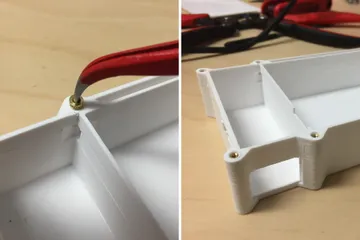
At Viget we use 3D printed components in production hardware products. As a general rule we try to use our LulzBot Mini for anything reasonably sized that may need replicated. This is especially true for intricate components that are otherwise a bear to painstakingly tool by hand. We’re familiar with 3D printer tolerances, limits, and bake these into our designs. These considerations include specifically sized gaps between moving components and part heights that divide evenly into the layer-heights found in our production slicer profile.
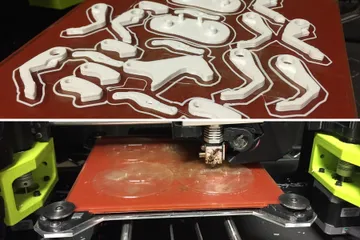
We developed 10 different design iterations before finalizing our model. This included two major motor changes to help reduce noise, and a number of linkage explorations. We were optimizing for function, noise, and depth. During each iteration we were quick to tweak our CAD model then lean on our LulzBot Mini to put that design into our hands (less than one hour later).
Some 3D printers are not as capable as the LulzBot lineup. Many printers fail when it comes to repeatability and uptime. During this project we used a combination of white nGen colorFabb filament for the horse, and clear t-Glase Taulman filament for the linkage and LED housing. nGen is a dimensionally stable material that prints at high temperature and bonds very well between layers. t-Glase is a more stiff translucent material that is also easy to sand and work with.
Early brooch prototypes demonstrated the motion of a the horse's legs while later prototypes refined production techniques. We discovered during the project that aesthetics surrounding the horse might not be finalized until the day before the Derby. To accommodate these known last-minute changes we designed the brooch to be completely disassemblable.
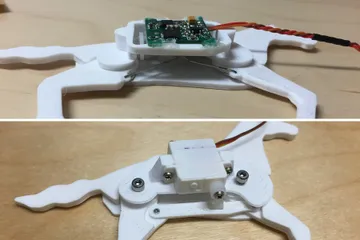
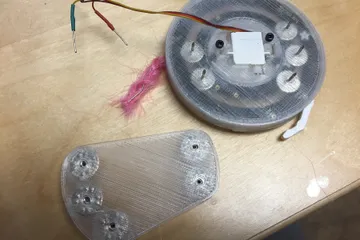
Plastic heat-set inserts were integral to the design made from 3D printed plastic. These brass components interfaced with M2 screws and allow us to essentially screw brooch components together without any concern for material fatigue. Expensive presses can be used to precisely set these brass inserts, however we do just fine with a soldering iron and some downward pressure.
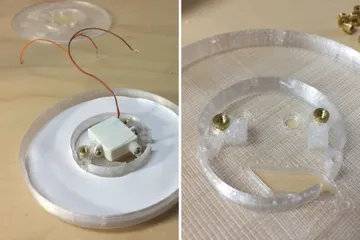
Two screws attached the horse’s body to a translucent LED washer (see above). Two additional screws held the entire assembly together. Two eyeglass screws attached a 1.7g (.06oz) servo to a mount that was designed into the LED washer. And finally two other eyeglass screws connected a linkage to the horse’s legs
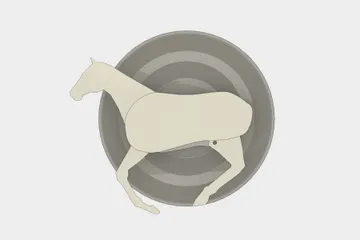
Here is a fully assembled brooch from our early concept collection:

Where did the wires go?
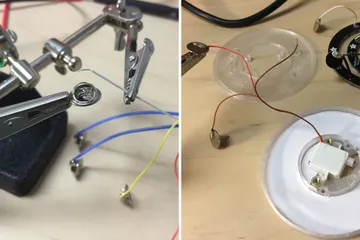
The brooch was powered through pins that also connected the brooch to Johnny’s lapel. This allowed us to elegantly hide wires on the inside of his jacket before routing them down to an electronics module clipped to his waist.
Electronics Module
We built an electronics module for the brooch to handle both power management and networking. And because this was broadcast TV, we built backups to ensure that no matter what, we had viable solutions to nearly any issue ready and accessible.
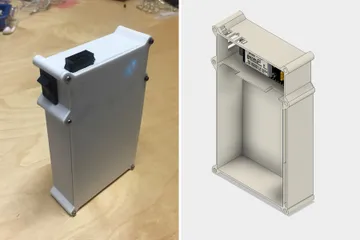
These modules came in two flavors (WiFi or cellular). Because networking at the Derby, especially cellular, was an unknown we wanted the ability to hot-swap on the fly. Our custom web-app allowed us to monitor the state of these devices remotely and also target multiple devices with control commands at once. Inside each module was the brooch’s brain -- either a Particle Photon (WiFi) or Particle Electron (3G).
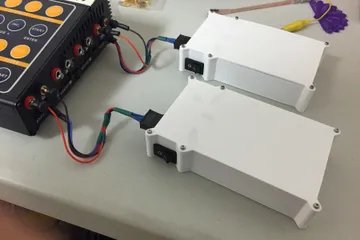
A custom wiring harness connected the brooch to the electronics module. This harness terminated with a dual-purpose 10 pin connector. On the electronics module this connector served as either a way to interface with the brooch or balance and charge the battery.
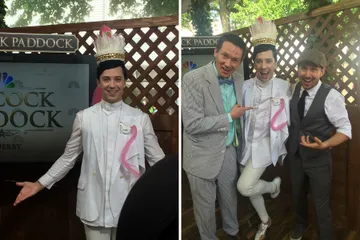
This is the final brooch pinned and ready to go. Notice the lack of wires and its extra long pink tail. It may be hard to see, but that pink tail matches a 5’ (152cm) long ponytail that Johnny rocked during the entire Derby. These are small details that make a big difference when working to pull off a stellar stunt. Check out Twitter and search for the #WatchMeNeighNeigh hashtag to get a feel for the buzz.
Curious about Viget or work we do? From products to marketing stunts we engage with everyone. Visit our work page to see more projects or get in touch!