Bringing Slack into the Physical world with SlackAlert
Justin Sinichko, Former Hardware Developer
Article Categories:
Posted on
Hardware that lights up, plays jingles, and interacts with Slack.
We love Slack and there’s no doubt that it’s changed the way we communicate as a company. We use it on our computers and phones but wanted to create a way to send messages to and from Slack sans screens. We’ve all been caught in situations without the ability to Slack ASAP, whether it’s finding yourself locked in the office stairwell, running low on cereal, or ringing the sales gong. That’s why we created SlackAlert, a magic piece of hardware that integrates with every Slack channel.
Want to build your own? Let’s get started!
Hardware
Begin by connecting a button to the web. We prefer to use Screenless for rapidly prototyping connected user interfaces. It includes four buttons as well as provisions for visual (LED ring) and audible (buzzer) feedback. If you have one of the other development kits from Particle you should continue to follow along. These instructions are just as applicable.
Visit the Screenless GitHub repo and follow the assembly instructions.
Software
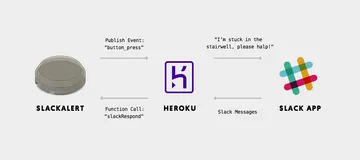
The goal is to push a button, post a message to Slack, and be notified that someone received our message. Nothing complex here. Our simple architecture is as follows:
Firmware
Begin by cloning the Screenless GitHub repo. Next, replace ‘screenless-example.ino’ with this one for SlackAlert. Finally, flash the Particle Photon with the updated codebase. Every time a button is pressed the device will publish a “button_press” Particle event.
Web App
Then, create the Rails application. Visit this repo and follow all of the instructions. This lightweight rails app handles button presses and Slack responses.
Feel free to expand the list of intentional regexes that register as a response to a SlackAlert.
# lib/slack_response_handler.rb
def intentional_regexes
 [
  /on it/i,
  /be there/i,
  /got you/i,
  /gotchu/i
 ]
end
Slack Integration
Next, integrate the webapp with Slack:
- Setup an incoming webhook integration
- Create a new incoming webhook
- Note your Webhook URL
- Customize name and icon
- Setup an outgoing webhook integration
- Create a new outgoing webhook
- Configure with this URL: https://[YOURAPPNAME].herokuap...
- Customize name and icon
This basic integration allows our web app to both post and receive messages in Slack. When a button on Screenless is pressed we want to act on it. Similarly when a message in Slack indicates a response we also want to act on it.
Capture the “button_press” event and route it to our app by creating a Particle webhook.
Install the Particle CLI if you haven’t already
$ particle webhook GET button_press http://[YOURAPPNAME].herokuapp.com/halp
When the Particle event “button_press” is published this webhook will route the request to the provided URL.
Update Web App
Finally, configure the application secrets with the proper Slack API URL, which can be obtained from your Slack services integration settings. This enables your app to post messages to the correct Slack channel.
# config/secrets.yml
development:
  secret_key_base: "c4b5b37b7c2ad8c04..."
  slack_api_url:   "https://hooks.slack.com/services/secret_1/secret_2/secret_3"

production:
  secret_key_base: <%= ENV["SECRET_KEY_BASE"] %>
  slack_api_url:   <%= ENV["SLACK_API_URL"] %>
Bringing it all together
Power up Screenless and wait for it to connect to the internet. Once the onboard LED is breathing cyan go ahead and give it a push.
If everything is working correctly a LED should begin to run clockwise around the outside edge and a tune will play. In Slack a message will appear. Respond to this message with one of the intentional responses i.e.: "on it".
Screenless should send the LED around in the opposite direction and play another tune. This means someone is on their way to save the day.
Enjoy!