Using JUnit on CircleCI 2.0 with Jest and ESLint

Nate Hunzaker, Former Development Director
Article Categories:
Posted on
JUnit brings concise feedback to our Circle CI 2.0 JavaScript builds. Here's how it works.
We're big believers in automated testing and deployment. However it can generate a staggering amount of information. Being able to quickly determine the source of an issue saves time and avoids headaches.
In this post I'll share how we use JUnit reporting to get concise feedback out of CircleCI. Instead of crawling through lengthy output, CircleCI tells us precisely what failed at the top of our build pages.
Here's what I mean:
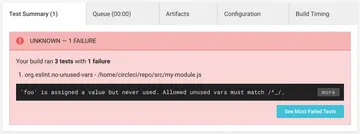
If you're just looking for a CircleCI config, take a look here. Otherwise brace yourself for the wild and wonderful world of test reporting!
What is JUnit? #
JUnit is a unit testing framework for Java. Yes, Java. While we don't use it for testing JavaScript, the reporting format it generates has become a standard that many tools support (including CircleCI). Most JavaScript tools can generate JUnit reports – perfect for our needs.
JUnit reports are XML files. They look like this:
<testsuites name="jest tests">
  <testsuite name="My test suite" tests="7" errors="0" failures="0" skipped="0" timestamp="2017-09-05T23:56:38" time="2.534">
    <testcase classname="My test" time="0.013">
    </testcase>
  </testsuite>
</testsuites>
Setting it up #
For CircleCI 2.0 to know that we have a test report, first we have to generate it.
Generating JUnit Reports with Jest #
We use the jest-junit npm package. In local development, this code is never executed, however by passing the --testResultsProcessor flag we can tell Jest to generate a Junit report:
jest --ci --testResultsProcessor="jest-junit"Make sure to add this as a development dependency! I've also included the --ci flag, which improves the behavior of certain Jest operations like snapshot testing during continuous integration.
If you run this locally, you'll probably see a test-results.xml document at the root of your project. However on CircleCI we'll put it in a consistent directory with all other reports.
In .circleci/config.yml, our test command looks something like:
# See the full version here:
# https://github.com/vigetlabs/junit-blog-post/blob/master/.circleci/config.yml
version: 2
jobs:
  build:
    # Docker image and other setup steps ommitted
    steps:
      # Setup steps omitted
      - run:
          name: "JavaScript Test Suite"
          # yarn here makes sure we are using the local jest binary
          command: yarn jest -- --ci --testResultsProcessor="jest-junit"
          environment:
            JEST_JUNIT_OUTPUT: "reports/junit/js-test-results.xml"
      - store_test_results:
          path: reports/junit
      - store_artifacts:
          path: reports/junit
This configuration tells CircleCI to run the command we mentioned earlier, setting an environment variable for where jest-junit should put the report. store_tests_results tells CircleCI that there is a test report. I also like to include store_artifacts to make the generated reports accessible later.
This concludes setting up Jest with JUnit on CircleCI 2.0.
Generating JUnit Reports with ESLint #
While we lean on Prettier to rule out the possiblity of code formatting inconsistencies, we still use ESLint to catch common mistakes in our code, including bad variable references or incorrectly imported modules. ESLint also tends to give more specific feedback on the location of these issues that might otherwise by glossed over in a failed unit test.
Generating a JUnit report for ESLint is simple. It does this out of the box!
eslint --format junit -o reports/junit/js-lint-results.xmlFollowing our previous example, hooking this up in CircleCI 2 is just as easy:
# See the full version here:
# https://github.com/vigetlabs/junit-blog-post/blob/master/.circleci/config.yml
version: 2
jobs:
  build:
    # Docker image and other setup steps ommitted
    steps:
      # Setup steps omitted
      - run:
          name: "JavaScript Linter"
          # yarn here makes sure we are using the local jest binary
          command: yarn lint -- --format junit -o reports/junit/js-lint-results.xml
      # Note: this hasn't changed. Don't add this twice!
      - store_test_results:
          path: reports/junit
      - store_artifacts:
          path: reports/junit
That's it. We did it. #
That's really all it takes! Here's the full CircleCI configuration for good measure:
version: 2
jobs:
  build:
    docker:
      - image: circleci/node:7.10
    working_directory: ~/repo
    steps:
      - checkout
      - restore_cache:
          keys:
          - v1-dependencies-{{ checksum "package.json" }}
          - v1-dependencies-
      - run: yarn install
      - save_cache:
          paths:
            - node_modules
          key: v1-dependencies-{{ checksum "package.json" }}
      - run:
          name: "JavaScript Linter"
          command: yarn lint -- --format junit -o reports/junit/js-lint-results.xml
      - run:
          name: "JavaScript Test Suite"
          environment:
            JEST_JUNIT_OUTPUT: reports/junit/js-test-results.xml
          command: yarn test -- --ci --testResultsProcessor="jest-junit"
      - store_test_results:
          path: reports/junit
      - store_artifacts:
          path: reports/junit
Wrapping up #
Taking these extra measures on our projects has yielded tremendous improvements to our workflow. I'd love to hear what you are doing to improve your experience with continuous integration services as well!