Using ARKit and Image Tracking to Augment a Postcard

Prayash Thapa, Former Developer
Article Categories:
Posted on
ARKit 2 brings a suite of tools to help you build bigger and better AR experiences on iOS. One of its key features is the ability to look for certain 2D images in the real world, and anchor virtual content to the found images.
A Primer on AR #
Augmented Reality (AR) is the blending of interactive digital elements with the physical world. It creates an illusion of digital content (2D or 3D) inhabiting the real world. Until AR headsets become widely adopted, we will most likely experience AR through our mobile devices for the years to come. AR combines device motion tracking and advanced scene processing through state-of-the-art computer vision and machine learning algorithms to understand the user's surroundings.
You may have already seen several AR apps in the wild (Pokemon, Snapchat etc.), but AR can be more than just fun and novelty. You can use AR to preview furniture at scale, like the IKEA Place app, or you can use it to get accurate measurements of real-life objects (like the Measure app that comes by default in iOS 12).
AR may be a common phone feature today, but it's not limited to phones — building AR applications can help us imagine a near future in which glasses and contact lenses are augmenting our daily experience. Check out the film Sight on Vimeo for a good example of what AR might look like in the future.

Once you're thinking about AR beyond day-to-day activities, it opens up a lot of possibilities. For example, museums could provide AR apps so that visitors can point their phones at a painting to access new content. Retail stores can provide AR experiences that respond to the packaging of the items on sale, providing supplementary content to give customers more information. As you can imagine, AR opens up a new world of displaying and delivering content, with the added benefit of it all being available on anyone's mobile device. If you want to learn more, I recommend checking out this primer on AR.
I also really enjoy Nathan Gitter's AR prototypes on Twitter, they gives us a glimpse into the future of AR. I can't recommend reading his blog post about AR prototypes enough, he's got a ton of insight to share.
Mobile AR #
AR apps are super fun to play with, and they're quite fun to build too. You may have heard about ARKit or ARCore, SDKs provided by Apple and Google to create AR experiences on iOS/Android devices. These SDKs are opening up new horizons for developers by exposing high-level APIs to create AR applications. These APIs make tasks like plane detection (horizontal and vertical), 6-DOF motion tracking, facial recognition, and 3D rendering a lot more manageable. As these SDKs are advancing quite rapidly in parallel with computing power, these platforms will continue to roll out more advanced features for developers to start integrating right away.
Many AR experiences can be enhanced by using known features of the user's environment to trigger the appearance of virtual content, instead of letting it float about around the user. In iOS 11.3 and later, we can now add such features by enabling 2D image tracking in ARKit. We can provide these images as assets for our apps, and use them as references during tracking. When ARKit detects these images in the real world, we can then use that event to anchor 3D (or 2D) assets to the AR world.
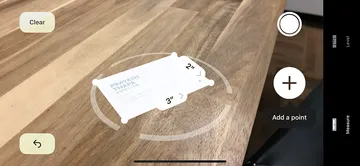
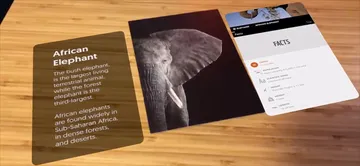
Today, I'll be guiding you through creating your own AR app. We'll use ARKit's image tracking feature to look for a 2D image in the real world, and anchor 3D content to it. I'm using a postcard of an elephant, but feel free to use any 2D image you want. I encourage you to print the image out, but you could technically track the image on your screen as well.
Here's what your final result should look like (you'll be using your own reference image for tracking of course). This beautiful postcard is courtesy of Brad Wilson.
Setup #
If you are new to iOS development, fear not, I've started a project for you to download and start hacking on right away. But before you download, you'll need to ensure that you have at least macOS High Sierra (10.13.xx) and Xcode 10 installed. These can take quite a bit time to install (and many of you may already have them installed), but you absolutely need them before moving forward. You will also need a physical iOS device with iOS 11.3+ installed so you can preview your AR experiences IRL.
This guide by Apple on the composition of iOS apps will give you a good understanding of what's going on and will make things easier to grasp down the road. A basic understanding of Swift and Object Oriented Programming will be helpful, but is not a strict requirement.
Ready? Brew yourself a strong cup of coffee/tea, because things are about to get real fun. Download the Git repo here and double click the AugmentedCard.xcodeproj file to open it in Xcode.
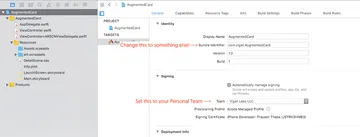
The master branch of the repo includes the final code and assets. I've created different branches for each step of this tutorial so you can refer to those if needed along the way. Before we start, run git checkout 1-setup inside of your Terminal (assuming you've cded into the root of the repo). You'll have to change the Bundle Identifier and Team before building the app to run on your device:
ARKit Foundation #
ARKit is an abstraction built by Apple that makes it surprisingly easy for you to build AR apps. The beauty of this is that you do not need to know the implementation details of how scene comprehension works or how the device is estimating lighting. The point is that we now have high-level interfaces that let us reach into these technologies and leverage their superpowers.
iOS apps are comprised of one or many screens that are represented by a special class provided by Apple's UIKit called UIViewController. Because our app will only have one screen, we'll be using a single instance of a UIViewController to display the camera feed and the AR experience on top of it.
With that said, here is the entire controller along with some inline documentation for you to read:
import UIKit
import ARKit

class ViewController: UIViewController {

    // Primary SceneKit view that renders the AR session
    @IBOutlet var sceneView: ARSCNView!

    // A serial queue for thread safety when modifying SceneKit's scene graph.
    let updateQueue = DispatchQueue(label: "\(Bundle.main.bundleIdentifier!).serialSCNQueue")

    // MARK: - Lifecycle

    // Called after the controller's view is loaded into memory.
    override func viewDidLoad() {
        super.viewDidLoad()

        // Set the view's delegate
        sceneView.delegate = self

        // Show statistics such as FPS and timing information (useful during development)
        sceneView.showsStatistics = true

        // Enable environment-based lighting
        sceneView.autoenablesDefaultLighting = true
        sceneView.automaticallyUpdatesLighting = true
    }

    // Notifies the view controller that its view is about to be added to a view hierarchy.
    override func viewWillAppear(_ animated: Bool) {
        super.viewWillAppear(animated)

        guard let refImages = ARReferenceImage.referenceImages(inGroupNamed: "AR Resources", bundle: Bundle.main) else {
                fatalError("Missing expected asset catalog resources.")
        }

        // Create a session configuration
        let configuration = ARImageTrackingConfiguration()
        configuration.trackingImages = refImages
        configuration.maximumNumberOfTrackedImages = 1

        // Run the view's session
        sceneView.session.run(configuration, options: ARSession.RunOptions(arrayLiteral: [.resetTracking, .removeExistingAnchors]))
    }

    // Notifies the view controller that its view is about to be removed from a view hierarchy.
    override func viewWillDisappear(_ animated: Bool) {
        super.viewWillDisappear(animated)

        // Pause the view's session
        sceneView.session.pause()
    }

}
Hopefully the comments make it clear what the code is doing, but the gist of it is that we're setting up the 3D scene and the AR session here. The ViewController mounts a sceneView onto the screen, which is a special view that draws the camera feed, and gives us lighting and 3D anchors to add virtual objects to. The ARImageTrackingConfiguration is what tells ARKit to look for a specific reference image that we've loaded into memory called refImages. We're also setting some debugging options so we can get stats like FPS on the screen.
Pro tip: If you want to refer to the documentation for any native SDK classes or functions, hold the option key and click on a native class (like UIViewController) to view the documentation in Xcode. This is a super handy feature of Xcode and will help you learn the API much quicker.

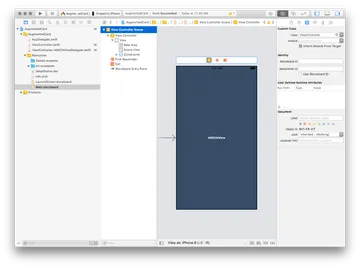
You might be wondering where our main ViewController is actually getting instantiated and mounted on the screen. That is the responsibility of the Storyboard, Apple's Interface Builder that gives us a drag-and-drop interface to lay out the UI and assign screens. We then hook into some lifecycle methods of UIVIewController to set up the AR session. You can see on the panel on the right that we've assigned our own custom class ViewController to this View Controller. The Scene View has also been added to the view hierarchy, which we can reference from the code.
Adding a Reference Image #
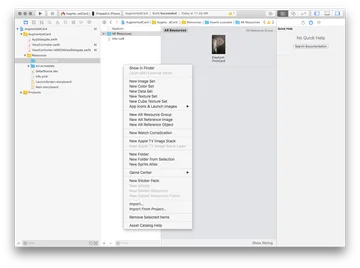
We'll now be adding our reference image. This is the image our app will be looking for in the real world. To add a reference image, we need to go to the Assets.xcassets folder in Xcode. Right click on the Asset Catalog pane and select New AR Resource Group. This will create an AR Resources folder where you will drag your image into. A couple gotchas here:
- When creating the image, create a canvas of the physical size (like 5 in. x 7 in. in Photoshop), then paste your image onto that canvas for exporting your final reference image.
- Once imported into Xcode, you need to specify the exact size of the image in Xcode after adding the image. Xcode will warn you about this. Refer to the ARReferenceImage documentation for more on that.
There are a few guidelines you should abide by when choosing a reference image. Apple shared this slide during their WWDC presentation to give us an idea of what we should be going for:

If you violate these guidelines, Xcode will give you a warning about your reference image. You'll still be able to compile and run the app, but your results will depend greatly upon your adherence to the guidelines above.
Visualize Image Tracking Results #
Before ARKit can start tracking your image, it needs to process the reference image first. It processes the image as grayscale and tries to find 'features' in the image that can be used as anchor points.
In order to visualize the result, we'll edit the ViewController+ARSCNViewDelegate.swift file. This file extends our default ViewController class and makes it a delegate for the sceneView (ARSCNView). To be a delegate means to be responsible for something. In this case, our extension will be responsible for all 3D rendering on the AR context. Because our ViewController now conforms to the ARSCNViewDelegate protocol, it needs to implement a specific set of methods to make the compiler happy. This is a key idea in Swift called Protocol-Oriented Programming. I've already added stubs for those methods so you don't need to worry about them, but if you do delete any of the stubbed methods then Xcode will yell at you.
The first thing we'll be doing is detecting when an anchor has been added. Because we configured our AR session to use the ARImageTrackingConfiguration configuration in the ViewController, it will automatically add a 3D anchor to the scene when it finds that image. We simply need to tell it what to render when it does add that anchor:
func renderer(_ renderer: SCNSceneRenderer, didAdd node: SCNNode, for anchor: ARAnchor) {
    guard let imageAnchor = anchor as? ARImageAnchor else { return }

    // Delegate rendering tasks to our `updateQueue` thread to keep things thread-safe!
    updateQueue.async {
        let physicalWidth = imageAnchor.referenceImage.physicalSize.width
        let physicalHeight = imageAnchor.referenceImage.physicalSize.height

        // Create a plane geometry to visualize the initial position of the detected image
        let mainPlane = SCNPlane(width: physicalWidth, height: physicalHeight)

        // This bit is important. It helps us create occlusion so virtual things stay hidden behind the detected image
        mainPlane.firstMaterial?.colorBufferWriteMask = .alpha

        // Create a SceneKit root node with the plane geometry to attach to the scene graph
        // This node will hold the virtual UI in place
        let mainNode = SCNNode(geometry: mainPlane)
        mainNode.eulerAngles.x = -.pi / 2
        mainNode.renderingOrder = -1
        mainNode.opacity = 1

        // Add the plane visualization to the scene
        node.addChildNode(mainNode)

        // Perform a quick animation to visualize the plane on which the image was detected.
        // We want to let our users know that the app is responding to the tracked image.
        self.highlightDetection(on: mainNode, width: physicalWidth, height: physicalHeight, completionHandler: {

            // Introduce virtual content
            self.displayDetailView(on: mainNode, xOffset: physicalWidth)

            // Animate the WebView to the right
            self.displayWebView(on: mainNode, xOffset: physicalWidth)

        })
    }
}
Try building and running the code above on your device. Point your device at your reference image and you should see a brief animation of a flashing white rectangle over the image. We want to start our experience by indicating to the user that the image has been detected before adding content. The motivation behind this is that from a UX standpoint, AR applications incur big setup costs for users. They have to download the app, open it, give it the appropriate permissions to access the camera, and have to wait another few seconds for the camera to calibrate and start detecting features. By giving them an indication of the anchor in the scene, it notifies them that something is happening.
Skimming through the code above, we're using the detected image to render a SceneKit plane on top. This is the plane where we'll put our virtual content. You can see that we're first going to highlight the detected plane for a few seconds, then display a detail view, followed by the web view. These methods are empty for now, as we'll be filling them in next.
Introducing Virtual Content #
Notice that we called 3 methods once the image was found: highlightDetection, displayDetailView, and displayWebView, but nothing really happened except the flashing white rectangle overlaying the reference image. If you look at the implementation of the displayDetailView method, it's empty. Let's go ahead and fill it out:
func displayDetailView(on rootNode: SCNNode, xOffset: CGFloat) {
    let detailPlane = SCNPlane(width: xOffset, height: xOffset * 1.4)
    detailPlane.cornerRadius = 0.25

    let detailNode = SCNNode(geometry: detailPlane)
    detailNode.geometry?.firstMaterial?.diffuse.contents = SKScene(fileNamed: "DetailScene")

    // Due to the origin of the iOS coordinate system, SCNMaterial's content appears upside down, so flip the y-axis.
    detailNode.geometry?.firstMaterial?.diffuse.contentsTransform = SCNMatrix4Translate(SCNMatrix4MakeScale(1, -1, 1), 0, 1, 0)
    detailNode.position.z -= 0.5
    detailNode.opacity = 0

    rootNode.addChildNode(detailNode)
    detailNode.runAction(.sequence([
        .wait(duration: 1.0),
        .fadeOpacity(to: 1.0, duration: 1.5),
        .moveBy(x: xOffset * -1.1, y: 0, z: -0.05, duration: 1.5),
        .moveBy(x: 0, y: 0, z: -0.05, duration: 0.2)
        ])
    )
}
Hopefully this is easy for you to read through and get a sense of what's going on. We create another SCNNode object which holds a plane geometry, and its material is actually going to be a SpriteKit scene. A SpriteKit scene is a 2D texture which can be created through Xcode's editor. Check out the Resources/DetailScene.sks file and feel free to modify it. This is what we'll be displaying on the face of a 3D plane. We then set an initial position and opacity for the node (it's invisible and behind the tracked image). We can then use SceneKit Actions API to fade it in and move it to the left of the image.
Adding a WebView #
We're almost there. Our next piece of virtual content will be an interactive Web view. This will load a specific URL and display it next to the postcard:
func displayWebView(on rootNode: SCNNode, xOffset: CGFloat) {
    // Xcode yells at us about the deprecation of UIWebView in iOS 12.0, but there is currently
    // a bug that does now allow us to use a WKWebView as a texture for our webViewNode
    // Note that UIWebViews should only be instantiated on the main thread!
    DispatchQueue.main.async {
        let request = URLRequest(url: URL(string: "https://www.worldwildlife.org/species/african-elephant#overview")!)
        let webView = UIWebView(frame: CGRect(x: 0, y: 0, width: 400, height: 672))
        webView.loadRequest(request)

        let webViewPlane = SCNPlane(width: xOffset, height: xOffset * 1.4)
        webViewPlane.cornerRadius = 0.25

        let webViewNode = SCNNode(geometry: webViewPlane)

        // Set the web view as webViewPlane's primary texture
        webViewNode.geometry?.firstMaterial?.diffuse.contents = webView
        webViewNode.position.z -= 0.5
        webViewNode.opacity = 0

        rootNode.addChildNode(webViewNode)
        webViewNode.runAction(.sequence([
            .wait(duration: 3.0),
            .fadeOpacity(to: 1.0, duration: 1.5),
            .moveBy(x: xOffset * 1.1, y: 0, z: -0.05, duration: 1.5),
            .moveBy(x: 0, y: 0, z: -0.05, duration: 0.2)
            ])
        )
    }
}
We've instantiated a UIWebView here and used it as a texture for a plane geometry. Finally, we animate its position and opacity so it moves to the right of the reference image. Xcode will give you a warning that UIWebView is deprecated in iOS 12 and that we should be using WKWebView, but at the time of this writing (January 2019), it is not possible to use WKWebView as a texture for a SceneKit plane due to a bug in the SDK, so we'll have to live with the warning until it gets fixed.
Try running the app again. Voila! We should have a static PNG and an interactive web view loading next to our image now.
Parting Thoughts #
Hooray! We're done. You should be able to run the app and preview it with your reference image. Make sure that your environment is well lit for optimal tracking. I hope this tutorial gave you a glimpse into the new world of possibilities that AR opens up. Do check out Apple's guide on image tracking which gives you more tips on best practices. We've laid a lot of groundwork here but you could easily extend this demo further by adding GIFs as SpriteKit textures, experimenting with other geometries and materials in SceneKit, playing around with animating other properties of the SceneKit nodes, and even importing your own 3D models to anchor to the reference image.
Personally, I'm excited about creating persistent AR experiences. ARKit 2 allows you to save mapping data of an environment and reload it on the fly, which is another exciting avenue to explore in AR. You could, for example, map your entire apartment or house and anchor 3D content to different areas in the house, and reload it later instantly. This could have some really interesting applications in the future, so as you play around with new AR features, try to think about how it could improve, or augment an ordinary experience. There are no rules, so have fun and let your imagination run wild!
Feel free to tweet at me @_prayash or leave a comment below if you want to share what you made, or if you have any follow-up questions. Have an AR idea that you'd like to prototype? Hit us up. We love exploring emerging tech with our clients.