Set Up Simulator and Test iOS Mobile Safari on Mac

Henry Bley-Vroman, Former Senior UI Developer
Article Categories:
Posted on
Full interactive iOS Mobile Safari browser testing is possible right on your Mac, no additional services necessary. We'll set up Apple's Simulator and configure it for testing Safari on a wide range of iOS versions and devices.
This article is part of a series on running cross-browser tests directly on your primary computer. The next in the series is Set Up a Windows 10 Virtual Machine and Run Internet Explorer 11 and Edge on Mac or Linux.
Part of preparing most websites and web apps for shipment is testing across devices. Several popular web-based browser testing services make it possible to test iOS's Mobile Safari, but the best of these tools require an additional fee, have limited free features, or restrict the number of users who can use an account at the same time. Apple makes iOS testing available for free to all macOS users, with their Simulator app. The app is hidden away and you need to go through some hoops to support older versions of iOS, but you don't need special technical know-how. Here's how to get it up and running with just a few clicks (and some longish download waits). It works for watchOS and tvOS as well!
Getting Ready
First install XCode, Apple's developer suit. Be prepared for a long download.
Simulator is a standalone app but it's buried deep within the hidden contents of XCode, where you can't get at it, and where Spotlight doesn't see it. So make a symbolic link of it in the Applications folder. Here's how, in case you don't know:
Open Terminal (in the Applications folder) or your favorite terminal app
Copy and paste this line:
ln -s /Applications/Xcode.app/Contents/Developer/Applications/Simulator.app /ApplicationsIf you're comfortable with that, hit Enter. Otherwise, skip down to the Addendum for an explanation.
Open up your Applications folder. You should see Simulator! And Spotlight should find it now too! (Note: Spotlight should find it. This stopped working for me the same day I updated from Xcode 9 to Xcode 10. Hopefully Apple fixes this.)
Using Simulator
Open Simulator (double click it from the Applications folder, or open it from Spotlight, or if you're psyched about flexing new-found command line powers run —type and follow with the Enter ⏎ key— the command open /Applications/Simulator.app).
Look at that! An iOS device!

Now you can click on the Safari icon and start browsing! But read on to get the most out of Simulator…
Configuring Simulator
With the devices you need all installed, let's get to know Simulator a little. We'll change the window size, add support for your computer keyboard, and add support for trackpad scrolling.
Turn on the ability to type in Simulator with your keyboard
By default, you have to use the on-screen keyboard to type in Simulator's iOS devices, just like you use the on-screen keyboard on a real iOS device. But you can turn on support for your physical keyboard:
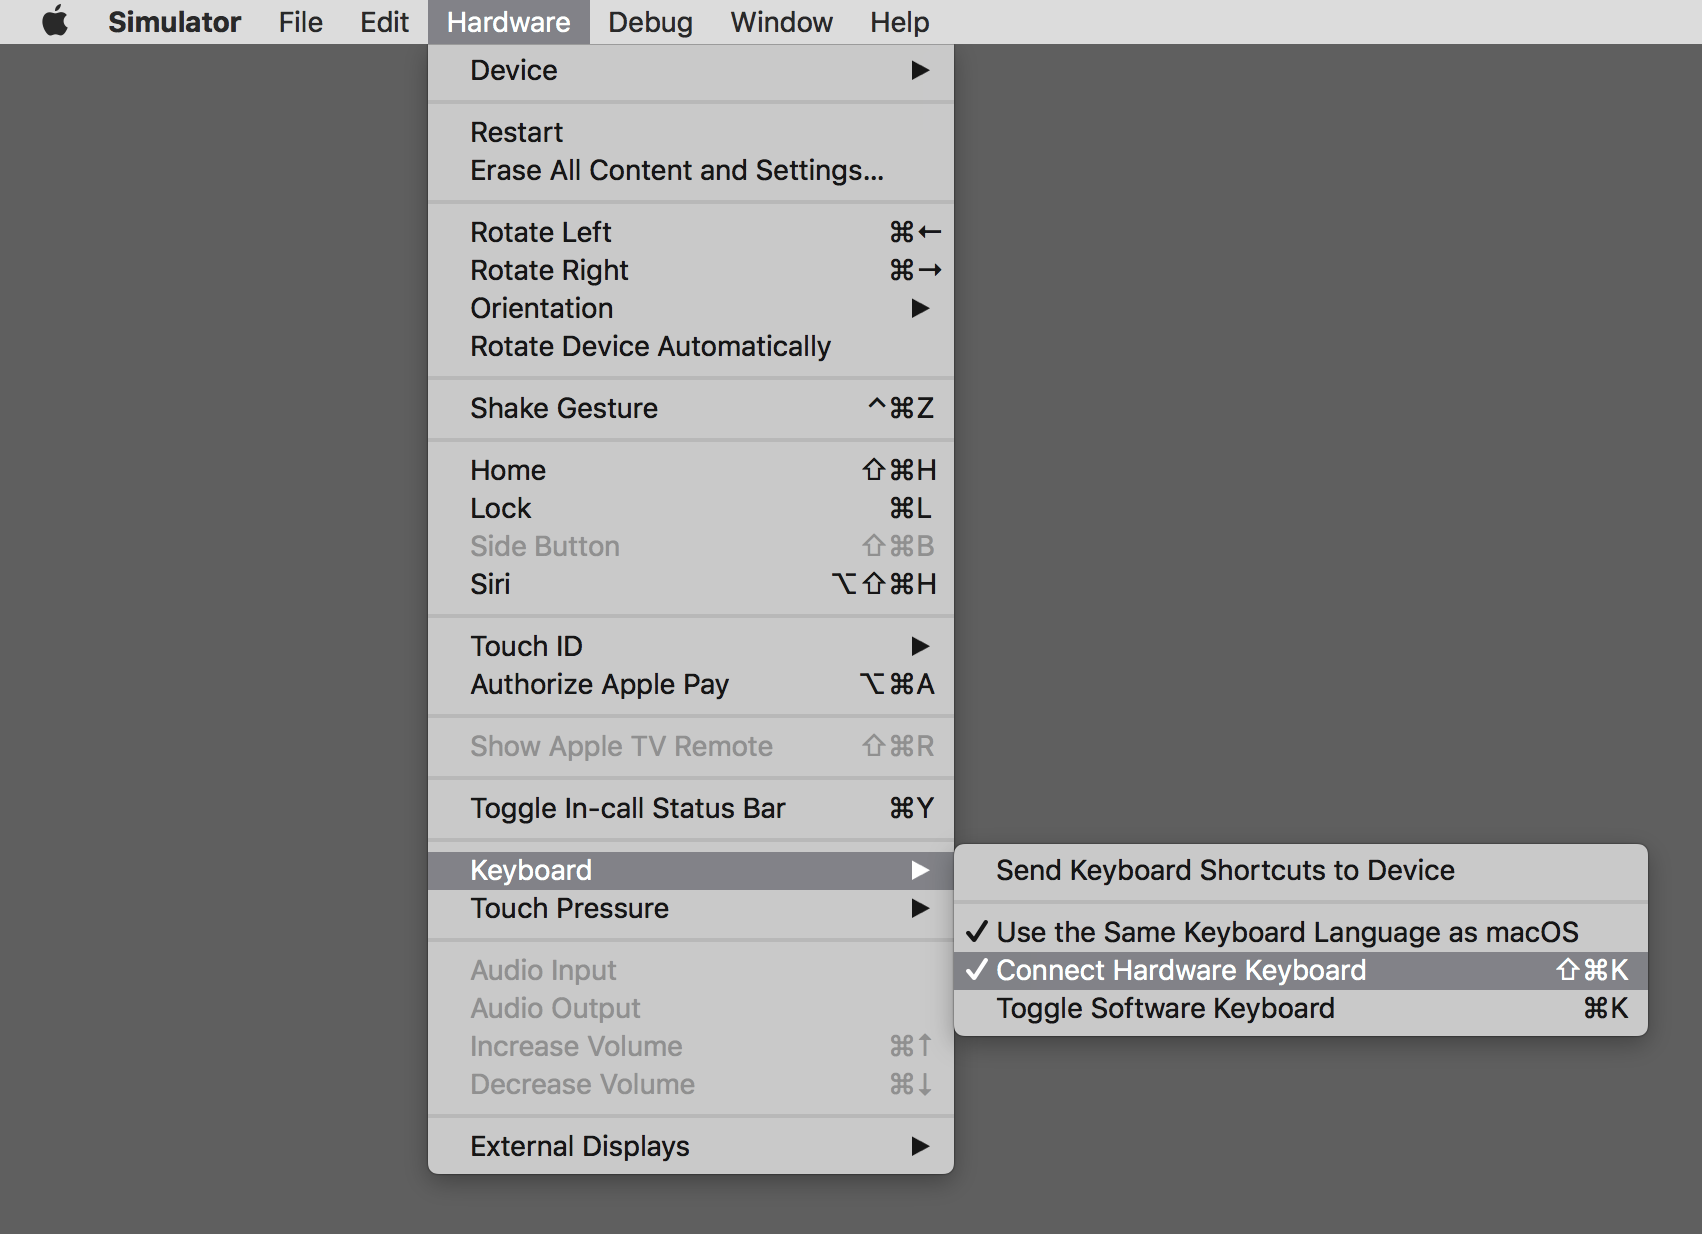
In Simulator's "Hardware" menu, under "Keyboard," check "Connect Hardware Keyboard."
Share the clipboard across macOS and your Simulator devices
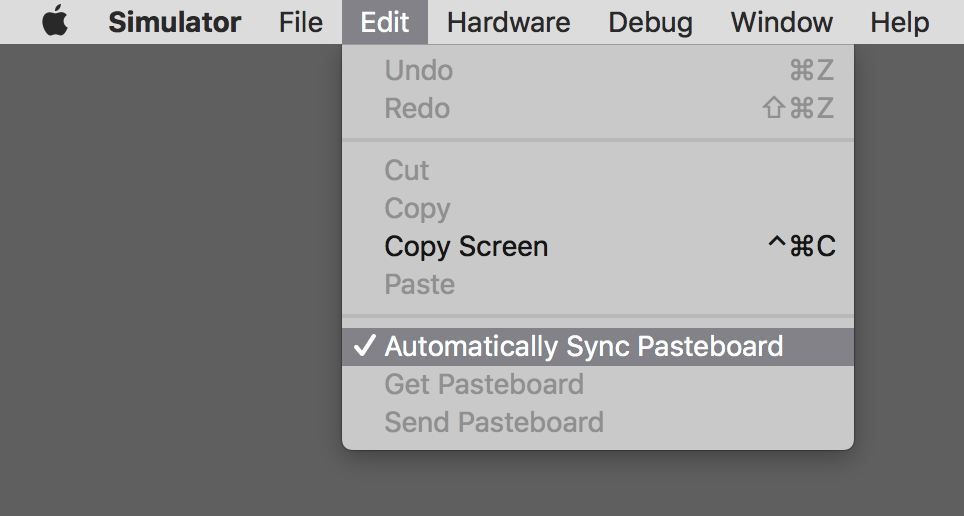
By default, the standard command v keyboard shortcut will not work to paste to Simulator from any other app. To turn on the shared clipboard (known in Apple devices as the pasteboard), select "Automatically Sync Pasteboard" from the "Edit" menu.
Note for users running older versions of Xcode: This worked differently prior to Simulator 10. You'll have to use shift command v to paste the macOS clipboard into the Simulator pasteboard, and then you can use command v to paste from the pasteboard.
Switching Devices
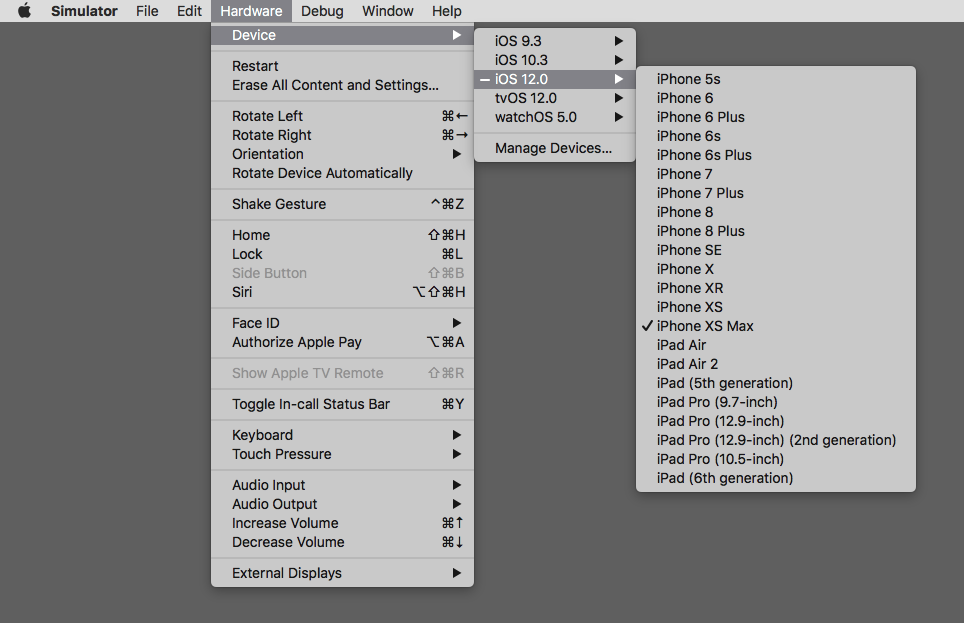
With Simulator you can test any Apple device. Select the device you want to use from the "Device" submenu in the "Hardware" menu. By default you'll have only the latest version of iOS, tvOS, and watchOS, but you can easily install "runtimes" for older versions.
Add support for older versions of iOS, tvOS, and watchOS
To add support for other versions of iOS, tvOS, or watchOS, first select "Manage Devices" from the the "Hardwear" menu's "Device" submenu. (For iOS marketshare by version, refer to iOS Distribution and iOS Market Share or Mobile & Tablet iOS Version Market Share Worldwide. Historically, the most recent and second most recent versions of iOS account for between 80–90% of iOS usage, with adoption of the most recent version taking several months to surpass the second most recent version.)
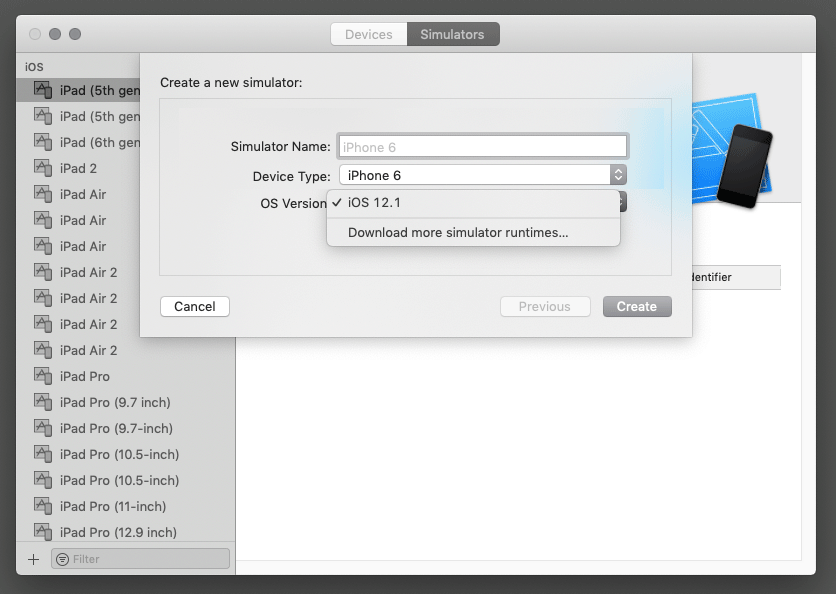
That will open the Xcode app's "Devices" window. Select the "Simulators" tab. Then click the + in the bottom left corner. (Note that your window may look different — as of this writing, it has been redesigned in every recent version of XCode. In XCode 9 you'll have to select "Add Device" from the +'s contextual menu).
Under "OS Version," select "Download more simulator runtimes."
Another new window opens, Xcode's "Components" preferences' list of simulators. Click the downward arrow button next to the OS you want to install support for.
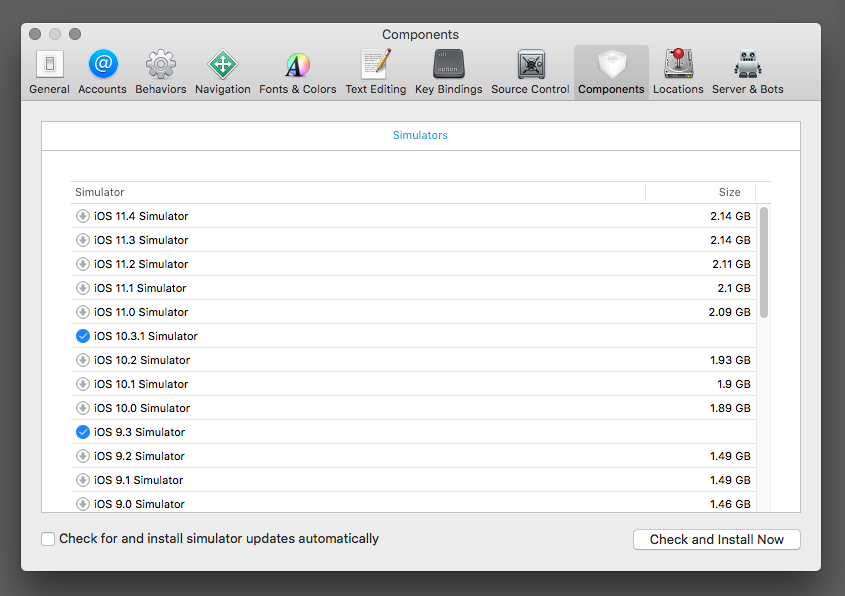
When the download is complete, close the window. Back in the "Create a new simulator" dialog:
- Leave the "Simulator Name" field blank.
- Select the device you want a simulator for.
- And the OS version you just downloaded should be an option now! (Note that "OS Version" is limited by "Device Type," so you must select the device type first.)
Click "Create," and quit Xcode. Back in Simulator, the device you just added should show up in the "Devices" list!
There you have it! If you aren't familiar with the command line and want to understand what the symbolic link command was doing, continue down to the addendum. Otherwise, you're set up to test things on iOS without going through some extra service!
Limited-audience bonus 1: Turn on three-finger trackpad scrolling in Simulator
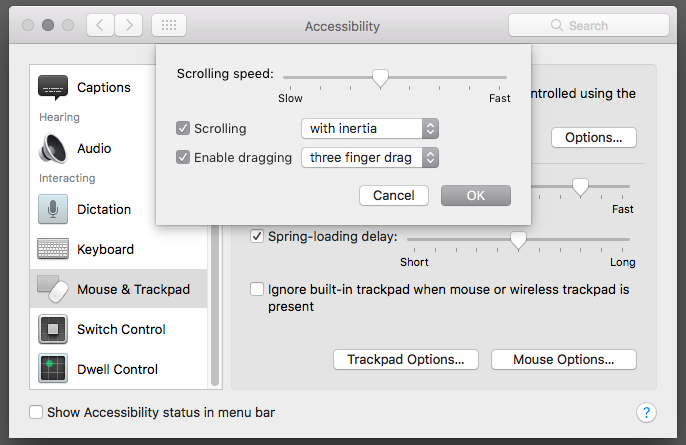
By default, you can scroll in a Simulator device by clicking and dragging. With the hardware keyboard connected, you can also use the keyboard arrow keys. If you're used to using trackpad scrolling (e.g. two-finger scrolling) in macOS, you may want to turn it on for Simulator too. While two-finger dragging isn't supported, three-finger dragging is. As of this writing, the experience really isn't good: there can be a initial delay, and then another delay before inertial scrolling kicks in. Here's how to turn it on:
From the System menu () open the "System Preferences," and from there, open the "Accessibility" preferences. Under "Mouse & Trackpad," open the "Trackpad Options" and turn on "three finger drag."
Limited-audience Bonus 2: Opening multiple Simulator devices on older versions of Xcode
Sometimes it's useful to have two devices up on the screen at the same time. Before, Xcode 8 (or was it 9?) Simulator could only run one device at a time. If you're on an older version of Simulator that doesn't support multiple devices, you can open two instances of the Simulator app with open -n:
open -n /Applications/Xcode.app/Contents/Developer/Applications/Simulator.app
open -n /Applications/Xcode.app/Contents/Developer/Applications/Simulator.app
The second instance of the app opens with an error "Unable to boot device in current state: booted." That's saying "the device you're asking to simulate is already being simulated," which is true — by default it's trying to open the same device as it's running in the first instance of the app. Say OK, then go to the Hardware menu > Device and choose a different device. (h/t i40west for the technique)
Addendum: what's that terminal command doing??
If you aren't familiar with the "command line," don't just run a command because someone on the internet says to. I don't know if it's ever really happened (it probably has), but there are plenty of urban legends of command line novices getting tricked into doing serious damage to their computers.
I've said that to make Simulator appear you run
ln -s /Applications/Xcode.app/Contents/Developer/Applications/Simulator.app /Applications
In a nutshell, the Simulator app is installed as part of Xcode, but it's hidden. So we create an alias (aka "shortcut" to people who learned the term on Windows) to the hidden app, and put the alias in the Applications folder.
Here's how it works:
The "command line" lets you run programs that don't have an interface — you tell the app what to do with text commands rather than by clicking on things. The first thing you write is the name of the command. Here, we're running ln, a command that creates links, the technical name for aliases (ln is short for "link").
Next, write the command-specific options. Option are set with "flags" prefixed with -. ln's -s flag turns on ln's "symbolic link" option. There are important differences between symbolic links and plain old links, but in this context what matters is that apps cannot be aliased with a link; apps must be aliased with a symbolic link.
The next thing ln needs to be told is the thing you want to create an alias to (the "source file"). All files on your computer have an address, written in the form folder/subfolder/file where in a/b/c "c" is inside "b" which is inside "a". This should look familiar from website URLs, and it's actually exactly the same: a website's URL reflects an actual folder structure on a computer somewhere. [More or less… That used to be a given; now it's only sometimes mostly true.] In our case, Xcode is in the "Applications" folder, and inside Xcode there's a Contents folder, and in that is a Developer folder, and in that is an Applications folder, and the Simulator app is in that.
Next you specify the place ln should put that alias (the "target directory"). It makes sense to put your alias to Simulator in the "Applications" folder: add a space after the source file's path, and then write /Applications. (See that / in front of /Applications, in both the source file and the target directory? That's saying "this is at the top level" - Xcode is a child of "Applications" but "Applications" is not the child of anything. One last bit of vocab: "Applications" is the parent of Xcode.)
Okay, hit Enter!