Making an Email-Powered E-Paper Picture Frame


How to build a DIY e-paper photo frame from scratch: the hardware, software, and some light woodworking
Over the winter, inspired by this digital photo frame that uses email to add new photos, I built and programmed a trio of e-paper picture frames for my family, and I thought it'd be cool to walk through the process in case someone out there wants to try something similar.
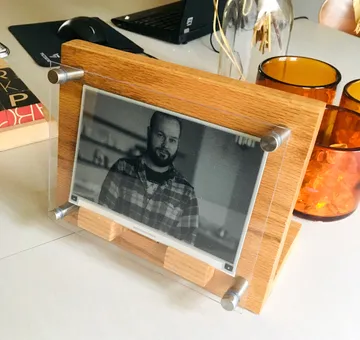
In short, it's a Raspberry Pi Zero connected to a roughly 5-by-7-inch e-paper screen, running some software I wrote in Go and living inside a frame I put together. This project consists of four main parts:
- The email-to-S3 gateway, described in detail in a previous post;
- The software to display the photos on the screen;
- Miscellaneous Raspberry Pi configuration; and
- The physical frame itself.
As for materials, you'll need the following:
- A Raspberry Pi Zero with headers
- An e-paper display
- A micro SD card (and some way to write to it)
- Some 1x4 lumber (I used oak)
- 4x metal standoffs
- A 6x8 piece of acrylic
- Some wood glue to attach the boards, and some wood screws to attach the standoffs
I'll get more into the woodworking tools down below.
The Email-to-S3 Gateway #
Like I said, I've already documented this part pretty thoroughly, but in short, we use an array of AWS services to set up an email address that fires off a Lambda function when it receives an email. The function extracts the attachments from the email, crops them a couple of ways (one for display on a webpage, the other for display on the screen), and uploads the results into an S3 bucket.
The Software #
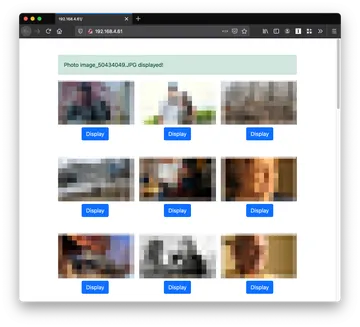
The next task was to write the code that runs on the Pi that can update the display periodically. I also thought it'd be cool if it could expose a simple web interface on the local network to let my family members browse the photos and display them on the frame. When selecting a language, I could have gone with either Ruby or Python, the former since that's what I'm most familiar with, the latter because that's what the code provided by Waveshare, the manufacturer, is written in.
But I chose neither of those options, reader, opting instead for Go. Why Go, you ask?
I wanted something robust. Ideally, this code will run on these devices for years with no downtime. If something does go wrong, I won't have any way to debug the problems remotely, instead having to wait until the next time I'm on the same wifi network with the failing device. Go's explicit error checking was appealing in this regard.
I wanted deployment to be simple. I didn't have any appetite for all the configuration required to get a Python or Ruby app running on the Pi. The fact that I could compile my code into a single binary that I could
scponto the device and manage withsystemdwas compelling.I wanted a web UI, but it wasn't the main focus. With Go, I could just import the built-in
net/httpto add simple web functionality.
To interface with the screen, I started with this super awesome GitHub project. Out of the box, it didn't work with my screen, I think because Waveshare offers a bunch of different screens and the specific instructions differ between them. So I forked it and found the specific Waveshare Python code that worked with my screen (this one, I believe), and then it was just a matter of updating the Go code to match the Python, which was tricky because I don't know very much about low-level electronics programming, but also pretty easy since the Go and Python are set up in pretty much the same way.
Here's my fork — if you go with the exact screen I linked to above, it should work, but there's a chance you end up having to do what I did and customizing it to match Waveshare's official source.
Writing the main Go program was a lot of fun. I managed to do it all — interfacing with the screen, displaying a random photo, and serving up a web interface — in one (IMO) pretty clean file. Here's the source, and I've added some scripts to hopefully making hacking on it a bit easier.
Configuring the Raspberry Pi #
Setting up the Pi was pretty straightforward, though not without a lot of trial-and-error the first time through:
- Flash Raspberry Pi OS onto the SD card
- Configure your wifi information and enable SSH
- Plug it in — if it doesn't join your network, you probably messed something up in step 2
- SSH in (
ssh pi@<192.168.XXX.XXX>, passwordraspberry) and put your public key in.ssh - Go ahead and run a full system update (
sudo apt update && sudo apt upgrade -y) - Install the AWS CLI and NTP (
sudo apt-get install awscli ntp) - You'll need some AWS credentials — if you already have a local
~/.aws/config, just put that file in the same place on the Pi; if not, runaws configure - Enable SPI — run
sudo raspi-config, then select "Interface Options", "SPI" - Upload
frame-server-armfrom your local machine usingscp; I have it living in/home/pi/frame - Copy the cron script into
/etc/cron.hourlyand make sure it has execute permissions (then give it a run to pull in the initial photos) - Add a line into the root user's crontab to run the script on startup:
@reboot /etc/cron.hourly/random-photo - Copy the
systemdservice into/etc/systemd/system, then enable and start it
And that should be it. The photo gallery should be accessible at a local IP and the photo should update hourly (though not ON the hour as that's not how cron.hourly works for some reason).
Building the Frame #
This part is strictly optional, and there are lots of ways you can display your frame. I took (a lot of) inspiration from this "DIY Modern Wood and Acrylic Photo Stand" with just a few modifications:
- I used just one sheet of acrylic instead of two
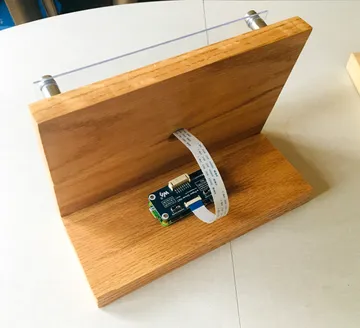
- I used a couple small pieces of wood with a shallow groove to create a shelf for the screen to rest on
- I used a drill press to make a 3/4" hole in the middle of the board to run the cable through
- I didn't bother with the pocket holes — wood glue is plenty strong
The tools I used were: a table saw, a miter saw, a drill press, a regular cordless drill (do not try to make the larger holes in the acrylic with a drill press omfg), an orbital sander, and some 12" clamps. I'd recommend starting with some cheap pine before using nicer wood — you'll probably screw something up the first time if you're anything like me.
This project was a lot of fun. Each part was pretty simple — I'm certainly no expert at AWS, Go programming, or woodworking — but combined together they make something pretty special. Thanks for reading, and I hope this inspires you to make something for your mom or someone else special to you.
Raspberry Pi illustration courtesy of Jonathan Rutheiser