Lulzbot Mini Y-Axis Endstop Repair

Justin Sinichko, Former Hardware Developer
Article Categories:
Posted on
When a limit switch fails the machine will attempt to zero an axis without knowing when to stop. Rumble & Growls.
I recently peeled back the sheetmetal of our Lulzbot Mini to fix a shorted y-axis min limit switch. A problem became evident when the y-axis stepper motor (located below the heated build plate) began to audibly rumble while attempting the initial zeroing routine.
What happens:
The Mini uses limit switches (physical buttons) to zero the machine along all three axises. When a limit switch fails the machine will attempt to zero an axis without knowing when to stop. This is what causes the rumbling sound… a very unhappy stepper motor.
Strangely this is our second Mini plagued with the exact same problem. Our first machine failed with this issue about 6 months in (heavy printing) and again with our second machine about 12 months in (again with heavy printing).
Diagnosis:
The problem lies either with the limit switch or the wiring. One way to quickly check which is the culprit is to lay the Mini on its side and swap the y-axis min limit switch connector with the y-axis max limit switch connector.
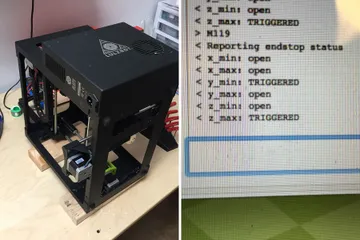
Launch Cura and from the control/Pronterface console and issue the “M119” command while physically pressing the problem limit switch. This command returns the state of each limit switch.
Remember you switched wire connectors so you care about the opposite limit switch’s status (min/max). If the opposite limit switch status indicates “open” there is a problem with the button. If it indicates “triggered” the problem is likely with the wiring. Remember to switch the connectors back.
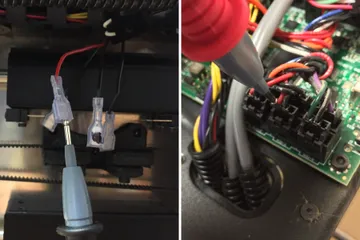
I was confident our problem was with the wiring. To validate I opened the case and grabbed a multimeter. Use Lulzbot’s open source assembly guide (step #9) to help position your multimeter on the Rambo board. Check for continuity on both red and black wires. Our red wire no longer had continuity.
Problem:
The problem is likely inside the Mini’s electrical harness and cable guide assembly. The machine uses narrow plastic cable guides with a wiring density that, over time, may be causing a problem.
Solution:
Option 1 : Disassemble the build plate and do a straightforward wire swap. The Lulzbot open hardware assembly instructions would make this a fairly straightforward option and potentially the solution you want to try. I instead opted for a less invasive quick fix:
Option 2: Run a second wire inside the wiring harness and bypass the problem wire. By installing a second wire on the outer perimeter of the cable guide I may avoid some extra friction and ultimately enjoy a longer-lasting fix. Unfortunately this doesn’t remove the possibility of the other limit-switch failing due to the same issue.
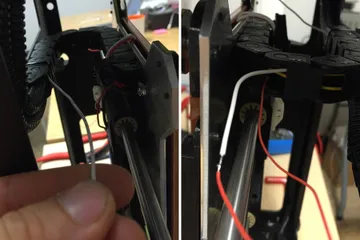
Using tweezers I fed a replacement wire through the top of the harness. To help route the replacement wire around the bend and through the bottom I inserted a solid-core guide wire from the opposite direction and soldered the two wire-ends together. This made it easy to pull the wire the remaining distance before routing it into the electrical box.
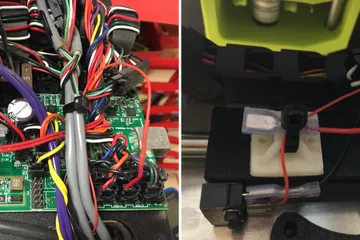
I spliced in the replacement wire (the untangled red one with heat shrink) into the control box and soldered the replacement wire directly to the y-axis min limit switch. Quick and dirty. Cleanup with tie bases and zip ties.
To verify the fix I issued the “M119” command again while physically pressing the y-axis min limit switch. It worked! Lesson: Things happen. Avoid walking away from a Mini while it is in use.