Build a Logo-Detecting App with iOS Machine Learning

Doug Avery, Former Senior Developer
Article Category:
Posted on
Apple's machine learning tools open the door for smart apps that solve problems the way a human would. Learn more with a simple demo app that detects the Viget logo.
(Brief) Intro to Machine Learning
Machine Learning is a big topic, but for this article, we're just talking about a subset of the field — "deep" learning with artificial neural networks. A deep learning network takes data and processes it with multiple layers of detection and abstraction, teaching itself how to solve a problem the same way a human would.
Solving some problems with traditional programming — say, determining the sentiment of a restaurant review — can be a huge undertaking. You'd need to write code that extracts every meaningful feature from a review, and write more code that evaluates these features. This will require handling numerous tricky cases like negation ("I had good service" vs. "I was hoping for good service"). Finally, you'd need to test your work on a huge data set to verify it works as expected.
With a well-made deep learning network, however, the process begins by feeding the network a huge set of reviews that you classify as "negative", "positive", or "neutral". The network automatically identifies features, figures out how they relate to each other, and teaches itself how features combine to suggest sentiment. For some problems, a deep learning solution is much faster and more accurate than a traditional one.
The output of a deep learning network is a "model", which you can think of as a pre-taught function that takes data and outputs guesses about the content of the data.
Machine Learning on iOS
Over the past few years, iOS has begun using built-in ML tools to perform core tasks like image classification and text prediction. Apple has continued to refine and expose these tools, allowing developers to piggyback off their existing ML work to build our own ML-driven applications.
The tools Apple provides are more powerful than ever — they can do sentiment detection, sound classification, and even determine "activity" types based on the phone's motion sensors. You can even configure your app to continually train the model on-device, customizing results per-user without needing a server or running into data privacy issues.
The great part about Apple's ML tools is that a beginner can easily get started and play around with the tools — with very little work, you can create apps with powerful machine-learning capabilities. So, let's see how!
Is It Viget?
The Viget logo mark is a simple set of two circles nearby at (roughly) a 2:1 ratio. The simplicity is what makes it so fun to play with — we've recreated the logo with overhead lights, carpentry, and even snuck it into designs like the Pointless Corp logo.
To learn a bit about ML on iOS, I built Is It Viget, an app that uses your phone camera to determine how "Viget" an image is. It can detect the logo printed on goods like shirts or notebooks, but also detects trickier cases like hand-drawn logos, circular objects placed in the logo configuration, etc. There are a few ways to solve this problem, but I wanted to use the simplest method to start — an image classifier.

Getting started: Assembling Training Data
The concept of a two-circle logo seems simple, but for a machine, there are a lot of complexities:
- Is the mark always two colors, or can it be mono-color?
- Are the circles always filled, or can they be outlines?
- Is the mark always a high-contrast image on a flat surface, or can it be something more interesting — etched on glass, built with 3D objects, or filled with a texture?
- Is the angle of the mark important, or can any two sized circles work?
- Can the mark be surrounded by other shapes, or does it need some margin around it to suggest "logo-ness"?
If you're only trying to detect a light-on-dark logo on flat surfaces, you don't need much data to train a classifier. But that's no fun — I wanted the app to detect the logo the same way a human would, by using a combination of these factors (sizing, spacing, surrounding shapes) to draw conclusions. That meant I needed a lot of data.
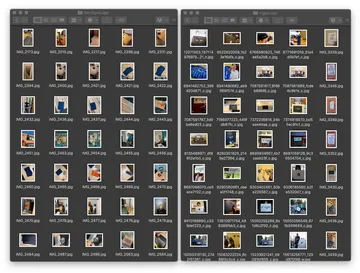
The model/data directory has two sub-directories: VigetLogo and NotVigetLogo. The latter folder can contain any image without the logo, really, but I got better results when I added images with strong similarities to VigetLogo images. The more data in these directories, the better — in the final version of the app, there are over 800 images. Finding and auditing this data can be a lot of work!
Improving Training Data
I made a lot of mistakes when training the app at first, and learned the following lessons:
- Check your data carefully. Initially, I trained the app with a few "not Viget" images that actually contained the logo (on a shirt, in the background, etc), confusing the model.
- Whenever possible, train using images similar to the intended input — i.e., a phone camera. I first trained the app using high-quality photos taken with our SLR cameras, but switching to iPhone photos improved the accuracy.
- Provide multiple examples of an image — During training, the ML tools will automatically remove a few photos for validation, so feeding it single examples can mean your data never actually gets used for training. If you're already taking a photo of a subject, take 5. Change the lighting, the angle of the shot, and the setting. Take more photos with the subject just out of frame, or with it covered.
- Remember that Core ML crops images to squares when training! Don't feed it images where the subject is too far off-center, or you'll confuse the model a lot.
After these were resolved, there was another problem: keeping 800 full-size images uses a huge amount of disk space, and training with them is painfully slow. The slower the training, the less likely I was to test and play with it — I needed a way to make training as low-cost as possible.
A simple solution was to add a small executable (bin/resize-model-images) that resizes and formats new data with ImageMagick:
#!/bin/bash

# Resize everything to high-quality 299px JPGs
find -E ./model/data -iregex '.*\.(jpe?g|png|heic)$' -exec mogrify -resize "299x299^" -format jpg -quality 100 {} +

# Remove leftover PNG and HEIC images after resizing
find -E ./model/data -type f -not -iregex '.*\.(jpe?g|DS_Store)$' -exec rm {} \;
Once this script was in place, training time was cut significantly, allowing me to play around with data and settings all I wanted.
Building the model
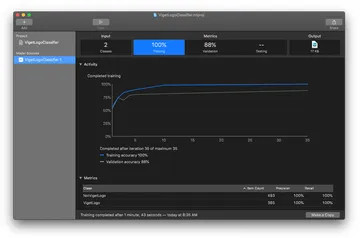
Xcode 11 includes a new tool for building ML models, available under Xcode > Developer Tools > Create ML. I started with the simplest template, an Image Classifier that takes a folder of images and classifies them based on the subdirectories. It's a very straightforward interface — point it to your data, select what options you want (optional pre-training steps like blurring, rotating, and flipping images), and hit the Train button. Create ML will give you feedback on how accurate it thinks the model will be ("validation"), and produce a .mlmodel file that's ready to drop into Xcode.
Using the model
The model is surprisingly easy to integrate with your iOS project. While there are a few new concepts to learn, the overall flow is pretty simple:
- On
viewDidLoad, start a timer that checks the camera once every second. - When the timer procs:
- Create a
VNImageRequestHandlerfor the camera image - Make the handler perform a
classificationRequest - If the request succeeds, process the results and determine how to update the UI.
- Create a
A cleaned-up version of the code looks something like this:
class ViewController: UIViewController {
    var checkTimer: Timer?
    let classificationCheckInterval = 1.0

    // The controller for our camera view; manages preview/switching cameras/etc
    let cameraController = CameraController()

    lazy var classificationRequest: VNCoreMLRequest = {
        do {
            let model = try VNCoreMLModel(for: VigetLogoClassifier().model)
            let request = VNCoreMLRequest(model: model, completionHandler: {
                [weak self] request, error in
                self?.processClassifications(for: request, error: error)
            })
            request.imageCropAndScaleOption = .centerCrop
            return request
        } catch {
            fatalError("Failed to load Vision ML model: \(error.localizedDescription)")
        }
    }()

    override func viewDidLoad() {
        ... // Setup the cameraController here

        // A timer that runs while the app is open, classifying images from
        // the camera every second. Another way to do this would be to detect
        // scene stability, but in testing, the 1-second timer just felt more "fun" to play with.
        // Read more here:
        // https://developer.apple.com/documentation/vision/training_a_create_ml_model_to_classify_flowers
        checkTimer = Timer.scheduledTimer(
            timeInterval: classificationCheckInterval,
            target: self,
            selector: #selector(checkImage),
            userInfo: nil,
            repeats: true
        )
    }

    @objc func checkImage() {
        cameraController.captureImage {(image, error) in
            guard let image = image else {
                return
            }

            self.updateClassifications(for: image)
        }
    }

    func updateClassifications(for image: UIImage) {
        let orientation = getCGOrientationFromUIImage(image)

        guard let ciImage = CIImage(image: image) else {
            fatalError("Unable to create \(CIImage.self) from \(image).")
        }

        DispatchQueue.global(qos: .userInitiated).async {
            let handler = VNImageRequestHandler(
                ciImage: ciImage, orientation: orientation
            )

            do {
                try handler.perform([self.classificationRequest])
            } catch {
                fatalError("Failed to preform classification: \(error.localizedDescription)")
            }
        }
    }

    func processClassifications(for request: VNRequest, error: Error?) {
        DispatchQueue.main.async {
            let results = request.results
            var confidence = Float(0.0)
            let classifications = results as! [VNClassificationObservation]

            // This setup allows for models with multiple logo classifications
            // (like "LightOnDarkVigetLogo", "DarkOnLightVigetLogo"),
            // which sometime produced better results in testing.
            if !classifications.isEmpty {
                let vigetClassifications = classifications.filter { $0.identifier != "NotVigetLogo" }
                confidence = vigetClassifications.max {
                    a, b in a.confidence < b.confidence
                }!.confidence
            }

            ... // Update the UI to display a visual indicator of confidence
        }
    }
}
Try the app yourself
Apple doesn't allow company-specific apps like this on the store, but if you'd like to try it on your phone, you can do so by building it locally with Xcode. If you're not familiar with the process, here are the steps:
Make sure you have the most recent version of Xcode installed. If not, install it first — it's a pretty big download.
- Download the Is It Viget project by visiting the project GitHub page and clicking "Clone or download."
- Connect your iOS device to your computer via USB. Make sure your computer is "trusted" by the device.
- Open Xcode.
- Go to Xcode > Preferences > Accounts and ensure your Apple ID is selected. If not, add it. (You don't need a developer account to build an app to your phone, just an Apple ID).
- Go to File > Open and select the
is-it-viget/iosdirectory. - Click on "Is It Viget" in the file explorer on the left, then "Signing & Capabilites". Make sure your name is selected as "Team"
- In the top left of Xcode, click the target device (to the right of the "stop" button) and change it to your USB-connected phone.
- Click the "play" button on the left, which will build and run the app on your phone. Make sure your phone is unlocked during this process!
If you run into issues, Twilio has written a post with some troubleshooting tips.
Further reading
- Understand Core ML on iOS in 5 Minutes (Dennis Hill)
A quick overview of the components and possible applications for iOS ML. - On-device training with Core ML – part 1 (Matthijs Hollemans)
A deeper dive into Core ML, including on-device training. - Create ML Tutorial: Getting Started (Audrey Tam)
A step-by-step tutorial for building an ML-trained camera app like Is It Viget. While some aspects of the tutorial are a little outdated, it's a great way to get started, and goes deeper into various training methods. - Animate Your iOS Splash Screen (Viget)
A second post about this app, covering the fancy launch screen animation you see when launching for the first time.