Intro to JavaScript Tooling: Creating a React App Without create-react-app

Mariel de la Garza, Former Developer
Article Categories:
Posted on
A basic intro to JavaScript tooling: Prettier, ESLint, npm, Parcel, Babel, and Browserslist
Building interactive websites is hard. React is a JavaScript library that exists to make it easier by - among other things - keeping track of your application’s state and quickly rendering any changes to the DOM (...quickly REACTing, if you will). Because React is a library, you can integrate as little or as much as you want. You can create an entire frontend with it or use it to "add some interactivity to a simple HTML page." Getting started with React is as simple as adding a line of <script> to your HTML index page, but that doesn't take care of things like browser compatibility or dependency management - you'll still need to set up the rest of your application tooling yourself. HOWEVER, developers are very lazy, so there's something that can do all of that for you, and it's called create-react-app.
A Solution that Creates a Problem #
Recommended by the React team for those "learning" or "creating a new single-page app", create-react-app is one of the first things a lot of JS devs learn when starting out with React. This is because it abstracts away some of the tooling you'd need to do on your own (like adding Babel and Webpack or Parcel), creates a directory structure for you, adds a couple of starter files, and lets you skip straight to writing your flawless JSX.
The problem is: abstraction is all fun and games until you need to edit or understand the things being abstracted away. It's the same vibe as "You won't always have a CALCULATOR in your POCKET." While our middle school math teachers turned out to be completely wrong, the underlying idea was a good one. I recently realized that relying on frameworks and libraries like create-react-app has meant JavaScript tooling is one of the biggest gaps in my knowledge.
SO. TODAY. We're going to cover how to set up a simple app on our own - we'll do some basic (basic) tooling and get as far as a plain <p> on the screen. From there you can either go conquer the world from scratch, or go back to using create-react-app but be glad you understand better what's happening and why using it is helpful. Let's go.
Tools: what are they? #
The utilities and libraries that help manage a modern JS project are commonly referred to as JavaScript Tooling. A few key categories of tools are below, though more categories exist.
Code Formatters #
Writing in a programming language is like writing in any other other language: you can of course write however you want, but if you want other people (or machines) to understand what you mean, you've got to conform to certain grammar and style rules.
Formatters exist for many different languages and can fix things like missing semicolons (super helpful with JavaScript) and keep your code easy to read. One of the most important and helpful things formatters can do is keep code formatting and styling consistent across a team of developers. Once more than one person is working on the same file, you don't want to have to think about how one person decides to align and space their code versus another, I promise.
Code Linters #
A "linter" or "lint roller" takes fuzzballs and stray strings and hairs off of clothing - especially useful if you have a dog or a cat. In much the same way, a code linter goes over your code and flags anything that may be an issue, from questionable patterns to deviations from style guidelines. If formatters check your styling, think of linters as checking your grammar.
Originally created in 1978 for use with C (and named after fabric linters!), linters now exist for a lot of different things.
Module Bundlers #
Modules are separate pieces of something - code, wood, units of study - that can be combined to make a larger thing. A module can stand on its own - you can have a piece of wood without also building a chair, and you can have a unit of study without having an entire book on the subject.
JavaScript modules are pieces of JavaScript that are kept separate but may be combined to create or add to an app. At the most basic level, a JavaScript module is a file. A module has its own functionality, can be imported and exported around your app, has its own top-level scope and is not available in the global scope. There's a lot more to it, but the TL;DR is that modules are important to managing the complexity of modern JavaScript apps.
While modules are helpful, they introduce their own set of problems. In the past, to use a group of different modules you'd have needed to include a <script> for each additional library or functionality. Alternatively, you could use one giant .js file. These methods lead to problems with performance, scope, usability, readability, maintainability — all the abilities. Immediately invoked function expressions (IIFEs) help with scope, but have issues related to performance and optimization.
Luckily we live in the future and module bundlers exist. Bundlers can look at a bunch of modules, resolve their dependencies, and package them together. They reduce the number of HTTP requests needed by combining things into single files (or 'bundles') which helps avoid bottlenecks. While packaging your modules together, bundlers also handle dependency relationships. A bundler can help your browser know when to use what pieces of JavaScript, give the browser what it needs in dependency order, and generally increase performance without making you do a lot of tedious work you don't want to do.
Package Managers #
Package managers help you keep track of (manage) your project's dependencies. A dependency is third-party code that your project uses to run. Your project is dependent on that code because without it, some piece of your project will break. Handling packages manually can be fine, but can very quickly get out of hand depending on how many dependencies you have and how many versions and dependencies they have, and so on down the rabbit hole. A package manger will handle installing, upgrading, and configuring these extra pieces of code (packages) for you.
Transpilers #
Generally, a compiler is a program that takes code you've written in a language you understand and translates it into code your machine understands. Transpilers are are subset of compilers (source-to-source compilers). A transpiler takes the code you've written and instead of turning it into machine code, it translates it into other human-readable code. JavaScript is not a compiled language, but an interpreted language. Compiled languages need to be compiled before they can run, but JavaScript skips that step. The browser reads and interprets the JavaScript as it goes.
Because JavaScript changes faster than browsers do, a transpiler allows you to use the newest fanciest JavaScript features and have them converted back to JavaScript that your browser understands (ES2015 and older). A transpiler also lets you avoid the issues that come with browser compatibility. Chrome, Firefox, and Safari all use different JavaScript engines, which could be annoying if you had to handle the differences yourself but because of transpilers you don't so hooray!
Tool Choices #
Prettier #
The most popular formatter for JavaScript, and the one we'll use, is Prettier. In the docs, you can find a list of rules that check for: syntax and logic errors, whether code conforms to best practices, issues with variable declarations, and specified style issues.
ESLint #
For JavaScript, the most popular linter is ESLint. JavaScript is a dynamic, weakly typed language. It's weakly typed because its variables aren't restricted to a single specific data type, and you do not need to tell those variables up front what their type is. It's dynamic because its types are checked at run-time instead of compile-time. (We discussed above that JavaScript is not a compiled language.) The important thing to know is that these qualities make JavaScript really susceptible to developer errors and ESLint exists to help catch them.
Webpack and Parcel #
Webpack and Parcel are two of the most popular module bundlers and what you are likely use and see in projects you work on.
The most significant difference between Webpack and Parcel is probably the amount of configuration each requires. To get Webpack's true value, you need to use webpack.config.js and tell it exactly what you want for a lot of different things. (Webpack doesn't require a config file to get going, but to do pretty much anything else, you're going to need to set one up.) Parcel doesn't require any configuration. However, this means you have much more control over code splitting and customization with Webpack than you do with Parcel. There are other differences, such as initial build times and caching, but for basic needs you can do fine with either. For the rest of our example, we'll be using Parcel.
npm and Yarn #
Two of the most popular package managers are npm and Yarn - npm was released in 2010 and Yarn followed in 2016.
npm is actually a website, command line interface, and software registry. Combined, all of these things allow developers to share, borrow, and manage packages. Yarn was developed by an engineer at Facebook to improve performance over npm. Facebook invested in its continued development, but now "the active development team is composed of people employed by non-founders companies." Like npm, Yarn lets devs share, borrow, and manage packages for their projects.
They have several differences, including how their lockfiles are structured, what their output logs are like, and how they fetch packages. That being said, there are as many opinions about whether to use Yarn or npm as there are developers. For more about how they compare so you can decide for yourself, check out "Choosing Between NPM and Yarn" (Section.io) - it was written earlier this year and is probably a better comparison than the articles you'll find from several years ago.
Babel #
Babel is pretty cool. It's a transpiler, as we discussed above, that takes care of converting modern JavaScript to older JavaScript that browsers understand. It's easily the most popular and well-known JavaScript transpiler, and is probably what you'll be using and see being used. Babel actually has a repl that you can play with to see how it changes your code.
The Code #
Now we finally get to setting up some files. If you're tired of reading and want to skip to the GitHub repo, you can do that here.
Starting out: a smol app #
To start, go ahead and create a place for our stuff to live in. I just made an empty folder on my desktop named example. Inside it, create the following folder and files. We'll fill them out along the way.
src/
  index.html
  App.js
  Dog.js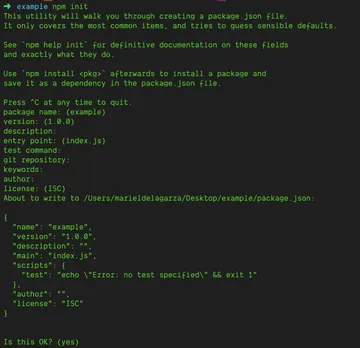
After you hit the last enter when it asks Is this OK?, you'll see your project now contains exactly one additional file: package.json. Take a look inside it, and you'll see it's just what the terminal showed you before asking Is this OK?.
PROGRESS.
Formatting with Prettier #
To get started with Prettier, we need to add it to our project by going to the terminal and running npm install -D prettier. The "D" tells npm that this is a "dev dependency", which means we need it for development but not production. We don't want to put it on the production server because code formatting isn't part of the app deployment concerns.
Once you've run npm install -D prettier on the command line, take a look at two things. First, look at the root of your project. You'll see a node_modules folder has been added. If you open it, you'll see a directory for prettier is right there. NEAT. (Don't touch .package-lock.json.)
Then, take a look inside the package.json file again. You'll see under "license": "ISC", it added "devDependencies". Your package.json file should now look like this:
{
  "name": "example",
  "version": "1.0.0",
  "description": "",
  "main": "index.js",
  "scripts": {
    "test": "echo \"Error: no test specified\" && exit 1"
  },
  "author": "",
  "license": "ISC",
  "devDependencies": {
    "prettier": "^2.3.2"
  }
}
But wait, there's more! In the root of your project, create a file named .prettierrc. This is the file where you can make any configuration changes you want. Since (again) devs are lazy, you can add an empty object to the file ({}) and boom, you're done. You'll be working with all of the default settings. Why add the empty file? "[T]o let editors and other tools know you are using Prettier."
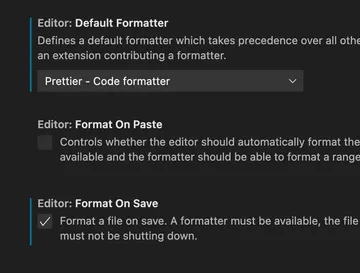
To get Prettier to actually run on your code, you can do a couple of things. If you're in VSCode, install the Prettier extension and then go to your VSCode settings. If you search for "format", it'll bring up the below. You want to check YES ABSOLUTELY format on save. From now on, every time you save your files you'll see your code become .... PRETTIER. Missing commas will appear, semicolons you forgot are added, and your bracket spacing will be adjusted. It's beautiful. **chef's kiss**
The other thing you can do is update the scripts in your package.json file. You'll want to do this even if you're using the Prettier extension in VSCode because, womp, it's possible that not everyone who touches your project will be using VSCode and we want things set up so anyone can easily poke around and contribute.
The scripts in package.json are commands you can run from the terminal by running npm run <scriptName>. Here, we want someone to be able to use Prettier by running npm run pretty. You can give it another name if you want: prettier-format, format, make-pretty. Make it something easy to remember since, again, this isn't just for you.
Regardless of what you name it, you need to tell it what files to format. Looking at the CLI docs for Prettier, we want our script to execute prettier --write and then something. It's best to tell Prettier what to look for rather than have it format all the things. If you scroll down to "File patterns", you'll see an example that will match all the JS files in a particular directory. That's what we want - we're going to tell Prettier to format all of the .js files inside of a directory named my-dir.
In our package.json file, inside "scripts", remove the existing line starting with "test" and add the below. You're telling prettier to format every .js, .jsx, and .json file inside the src directory, no matter how deeply nested. By telling Prettier where to look, you can make its checks as broad or as narrow as you want.
"scripts": {
    "pretty": "prettier --write \"src/**/*.{js,jsx,json}\""
  },
Now, anyone can run npm run pretty in the terminal and get the same formatting you get from the extension. Neat!
ESLint: Prettier's friend #
ESLint works together with Prettier to make sure your code styling is uniform and follows certain syntax and logic rules. You can leave all of the defaults in place, or you can make adjustments with the configuration file.
Install
To install ESLint, you want to go to the command line and run npm install -D eslint eslint-config-prettier. This tells npm that ESLint will be part of your dev dependencies, and that you want to install both the ESLint core library as well as a config that will "make ESLint and Prettier play nice with each other" by turning off rules that conflict with Prettier.
If you look inside the node_modules folder you'll see that the contents have grown ... a lot. It's not something you need to worry about right now. When you create a GitHub repository, you'll tell git to ignore that folder and not keep track of its changes or upload its contents to GitHub. (There are reasons you might want to commit the node_modules folder for certain projects, but mostly - no.) Something I wish I'd known earlier on: the node_modules folder takes up a ton of space, so if your machine doesn't have oodles of local storage, go ahead and delete it once you're ready to set a project aside. This dev freed up 13GB, and this dev freed up 15GB. You can always reinstall your packages if you go back to your project later.
Look at your package.json file and you should now see something like this. Check out the additions to devDependencies.
{
  "name": "example",
  "version": "1.0.0",
  "description": "",
  "main": "index.js",
  "scripts": {
    "pretty": "prettier --write \"src/**/*.{js,jsx,json}\""
  },
  "author": "",
  "license": "ISC",
  "devDependencies": {
    "eslint": "^7.32.0",
    "eslint-config-prettier": "^8.3.0",
    "prettier": "^2.3.2"
  }
}
Config
Similar to how we created the .prettierrc file, we need to create a .eslintrc.json file so we can specify some configurations. You can opt for existing config settings like those used by Airbnb or Netflix (or others), or you can create your own. Using eslint:recommended will get you all of the rules marked with a ✔️ in the ESLint docs.
An example config file is below, with explanations underneath.
{
  "extends": [
    "eslint:recommended",
    "prettier",
    "plugin:import/errors",
    "plugin:react/recommended"
  ],
  "plugins": ["react", "import"],
  "parserOptions": {
    "ecmaVersion": 2021,
    "sourceType": "module",
    "ecmaFeatures": {
      "jsx": true
    }
  },
  "rules": {
    "react/prop-types": 0,
    "react/react-in-jsx-scope": 0
  },
  "env": {
    "es6": true,
    "browser": true,
    "node": true
  },
  "settings": {
    "react": {
      "version": "detect"
    }
  }
}
Let's go over what those settings mean:
- The
extendskey tells ESLint what rule settings you're using. Addingprettiertells it to also use the config fromeslint-config-prettierthat we installed in order to make ESLint and Prettier work nicely together. The next two lines tell ESLint to apply rules from a couple of plugins we're about to add. - There are a lot of third-party
pluginsthat you can use which "expose additional rules for use in ESLint" or "tell ESLint how to process files other than JavaScript." They're optional, but since our example is a React app you want to add a couple to help ESLint understand. Add the two below, and make sure to specify them in the config file as in the example above.eslint-plugin-importsupports the linting of ES2015's import/export syntax. Go ahead and runnpm install -D eslint-plugin-import. Scroll down a bit on the npm page, and just above "TypeScript" you'll see"plugin:import/errors"to add to"extends".eslint-plugin-reactgives ESLint React-specific linting rules to apply to your work. Install withnpm install -D eslint-plugin-react. If you haven't yet, add"plugin:react/recommended"to"extends"in your config file. You'll see on the plugin's npm page that it's their "preset to get reasonable defaults".
"rules"will allow us to turn off some of the defaults that come with our plugins by setting them to0. Look at the npm page for ourreactplugin, and scroll down to the "List of supported rules." We don't want to use the two below:react/prop-types- Since this app is very basic, we're not dealing with prop types at all.react/react-in-jsx-scope- Below we'll learn that with our Babel settings, we won't need to import React at the top of every file anymore, which is what this rule would be looking for.
- In
parserOptions, you can "specify the JavaScript language options you want to support."- The
ecmaVersionis the version of JavaScript you want to use. You can give it the year (for example, 2015) or the version (6). We're going to tell it to use2021. sourceTypedefaults toscript, but if you're using modules (and we are), specifymodule.ecmaFeaturesis where you can specify "which additional language features you'd like to use." Since we're going to be working with React, enablejsx. The ESLint docs make a note that "supporting JSX syntax is not the same as supporting React," and that there's an additional plugin you can use if you "want React semantics." (Remember, we already added thereactplugin.)
- The
- The
envkey "defines global variables that are predefined." The ESLint docs provide you with a list of available environments. The ones you'll definitely want arees6(enable all ECMAScript 6 features except for modules),browser(browser global variables), andnode(Node.js global variables and Node.js scoping). - In
"settings", we're giving ESLint "information that should be shared across all of its rules." Looking again at the npm page for ourreactplugin, where we saw the"extends"value, we'll also see some"settings", including"react": {"version": "detect"}. This tells ESLint to use whichever version of React we'll be working with.
BUT WAIT. THERE'S MORE. Similar to how we added a script for running prettier, we want to add one for linting.
Go to your package.json file, and make sure scripts looks like the below example. If you compare it to the line for Prettier, you can see we're telling npm to run eslint on every .js and .jsx file. The --quiet flag tells it that we only want actual errors, not warnings.
"scripts": {
    "pretty": "prettier --write \"src/**/*.{js,jsx,json}\"",
    "eslint": "eslint \"src/**/*.{js,jsx}\" --quiet"
},Setting up Parcel #
We're going to go with Parcel here to avoid configuring Webpack since this is a simple example app. To install Parcel, we'll once again turn to the command line. If you look at the docs, the docs for Parcel 1 use parcel-bundler but you'll see in the docs for Parcel 2 that it's been shortened it to parcel. Below we'll use parcel, but note without any other specifications, it does install Parcel 2. We'll be using a version of Parcel 1, version 1.12.3, so you need to run: npm install -D parcel@1.12.3.
Open package.json and you'll see parcel has been added to devDependencies. In addition to your list of dependencies, you want to add a script that will let you spin up your development server. We want npm to run parcel (which is a shortcut for parcel serve), but we also want to tell it where to start. Giving it src/index.html tells it to start doing its work by first looking in src/index.html. This is called specifying an entry. Once we're done, you'll be able to run npm run dev and see our app at http://localhost:1234.
{
  "name": "example",
  "version": "1.0.0",
  "description": "",
  "main": "index.js",
  "scripts": {
    "pretty": "prettier --write \"src/**/*.{js,jsx,json}\"",
    "eslint": "eslint \"src/**/*.{js,jsx}\" --quiet",
    "dev": "parcel src/index.html"
  },
  "author": "",
  "license": "ISC",
  "devDependencies": {
    "eslint": "^7.32.0",
    "eslint-config-prettier": "^8.3.0",
    "eslint-plugin-import": "^2.24.1",
    "eslint-plugin-react": "^7.24.0",
    "parcel": "^1.12.3",
    "prettier": "^2.3.2"
  }
}
Detour: Adding our HTML and React #
When we started this adventure, we created a src directory with an index.html file and 2 .js files: one named App.js and another named Dog.js. Time to fill them out.
Again, since we're not focused on React in this post, we're just gonna do some copy-pasta here. No CSS, nothing fancy. We're just going to have our browser say: "Hello I am a dog. My name is Waffles. I am a Shih Tzu and a very good boy." (There is indeed a Shih Tzu named Waffles and he is the best boy.)
<!DOCTYPE html>
<html lang="en">
  <head>
    <meta charset="UTF-8" />
    <meta name="viewport" content="width=device-width, initial-scale=1.0" />
    <meta http-equiv="X-UA-Compatible" content="ie=edge" />
    <title>Tooling Example</title>
  </head>

  <body>
    <div id="root">If you see this I'm broken.</div>
    <script src="App.js"></script>
  </body>
</html>
// App.js
import { render } from "react-dom";
import Dog from "./Dog";
const App = () => {
return (
<div>
<p>Hello I am a dog</p>
<Dog name="Waffles" breed="Shih Tzu" gender="boy" />
</div>
);
};
render(<App />, document.getElementById("root"));
// Dog.js
const Dog = (props) => {
return (
<div>
<p>My name is {props.name}.</p>
<p>
I am a {props.breed} and a very good {props.gender}.
</p>
</div>
);
};
export default Dog;We also need to tell npm we'll be using React and React-Dom. In the command line, run npm install react@17.0.2 and npm install react-dom@17.0.2. (You can also install them at once if you prefer - npm install react@17.0.2 react-dom@17.0.2) You'll see your package.json file has updated and added a new key for dependencies, since we didn't use the -D flag. React is something we want in both development and production, so we don't tell npm it's a dev dependency.
{
  "name": "example",
  "version": "1.0.0",
  "description": "",
  "main": "index.js",
  "scripts": {
    "pretty": "prettier --write \"src/**/*.{js,jsx,json}\"",
    "eslint": "eslint \"src/**/*.{js,jsx}\" --quiet",
    "dev": "parcel src/index.html"
  },
  "author": "",
  "license": "ISC",
  "devDependencies": {
    "eslint": "^7.32.0",
    "eslint-config-prettier": "^8.3.0",
    "eslint-plugin-import": "^2.24.1",
    "eslint-plugin-react": "^7.24.0",
    "parcel": "^1.12.3",
    "prettier": "^2.3.2"
  },
  "dependencies": {
    "react": "^17.0.2",
    "react-dom": "^17.0.2"
  }
}Time to Babel #
You might be wondering why we didn't install Babel before setting up Parcel, and that's totally fair. On its own, Parcel will do some transpilation for you as long as you "specify a browserslist config" (which we'll do). This means we really only need to add the parts of Babel that we need, but are missing. @babel/preset-react and @babel/core will let us keep moving.
The Parcel docs specifically say: "If you use React...you'll need to add @babel/preset-react...yourself." This preset actually adds a couple of different plugins that handle React and JSX syntax. @babel/core is the Node API - once upon a version 5, you could install babel and get everything (transforms + CLI tools), "but this led to unnecessarily large downloads and was a bit confusing" so the Babel team "split it up into two separate packages: babel-cli and babel-core."
The TL;DR is that you need to run: npm install -D @babel/core@7.15.0 @babel/preset-react@7.14.5. Check that your package.json file has updated:
{
  "name": "example",
  "version": "1.0.0",
  "description": "",
  "main": "index.js",
  "scripts": {
    "pretty": "prettier --write \"src/**/*.{js,jsx,json}\"",
    "eslint": "eslint \"src/**/*.{js,jsx}\" --quiet",
    "dev": "parcel src/index.html"
  },
  "author": "",
  "license": "ISC",
  "devDependencies": {
    "@babel/core": "^7.15.0",
    "@babel/preset-react": "^7.14.5",
    "eslint": "^7.32.0",
    "eslint-config-prettier": "^8.3.0",
    "eslint-plugin-import": "^2.24.1",
    "eslint-plugin-react": "^7.24.0",
    "parcel": "^1.12.3",
    "prettier": "^2.3.2"
  },
  "dependencies": {
    "react": "^17.0.2",
    "react-dom": "^17.0.2"
  }
}
In the root of your project, create a .babelrc file. This is one type of configuration file - a file-relative configuration. There is another type called "project-wide configuration." The docs give a good rundown of each, but this Stack Overflow answer is a bit easier to understand:
.babelrcwould be useful if you want to run certain transformations / plugins on a subset of files /directories. Maybe you have 3rd party libraries that you don't want to be transformed/changed by babel.babel.config.jsonis useful if you have multiple packages (ie multiple package.json) directories in your project that utilize a single babel config. This is less common.
In our .babelrc file, we're going to implement a convenience that came with React 17. The React team worked with Babel to create a new JSX transform that does several things, among which is the automatic import of React. All you need to do is specify a runtime of automatic.
If you're used to starting each React file with import React from 'react', not needing the import feels strange at first, and you may decide you don't care since "you still need to import React in order to use Hooks or other exports that React provides." On the other hand, "starting from Babel 8, "automatic" will be the default runtime" so why not start now:
{
  "presets": [
    [
      "@babel/preset-react",
      {
        "runtime": "automatic"
      }
    ]
  ]
}Browserslist #
When you installed Parcel, it came with Browserslist, which lets you specify which browsers you want to support. This helps your tools "share target browsers and Node.js versions". You can tell it to use defaults, which means: > 0.5%, last 2 versions, Firefox ESR, not dead. Add this to your package.json file. In the example below, I just added it at the bottom:
{
  "name": "example",
  "version": "1.0.0",
  "description": "",
  "main": "index.js",
  "scripts": {
    "pretty": "prettier --write \"src/**/*.{js,jsx,json}\"",
    "eslint": "eslint \"src/**/*.{js,jsx}\" --quiet",
    "dev": "parcel src/index.html"
  },
  "author": "",
  "license": "ISC",
  "devDependencies": {
    "@babel/core": "^7.15.0",
    "@babel/preset-react": "^7.14.5",
    "eslint": "^7.32.0",
    "eslint-config-prettier": "^8.3.0",
    "eslint-plugin-import": "^2.24.1",
    "eslint-plugin-react": "^7.24.0",
    "parcel": "^1.12.3",
    "prettier": "^2.3.2"
  },
  "dependencies": {
    "react": "^17.0.2",
    "react-dom": "^17.0.2"
  },
  "browserslist": [
    "defaults"
  ]
}WE DID IT #
NOW, after ALL OF THAT: if you run npm run dev in your terminal and go to http://localhost:1234 you should see:
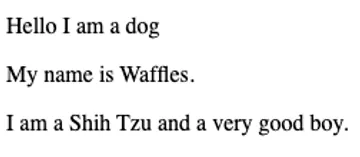
Ta daaaaa. . . . Okay, that's not exciting but this was about the JOURNEY. At least now (1) you'll kind of understand what's happening in the config files on projects you're on, (2) recognize what's happening in discussions senior devs are having about tooling, and (3) appreciate why create-react-app exists.
THE END.
Additional Resources #
- A Complete Guide to JavaScript Tooling
- [Comparison] Webpack or Parcel, which one is better?
- How to set up a React project with Parcel
- Package management basics
- What is a linter? Here's a definition and quick-start guide
- Compiler (Wikipedia)
- Demystifying
devDependenciesanddependencies - Is this a dependency or devDependency?