Implementing Custom UITableViewCell Separators in iOS

Prayash Thapa, Former Developer
Article Categories:
Posted on
Custom UITableViewCell separators allow you to modify the design of an otherwise bland table view in iOS. Let's explore how!
We recently wrapped up a rebuild of Viget Spots You, our home-grown mobile app for incentivizing employee wellness. Viget Spots You lets employees check into their preferred gyms and trigger automatic reimbursements after reaching the required number of visits (8 in our case). It was an opportunity to build a sleek mobile app with lots of room for fun design explorations, so we let our imaginations run wild.
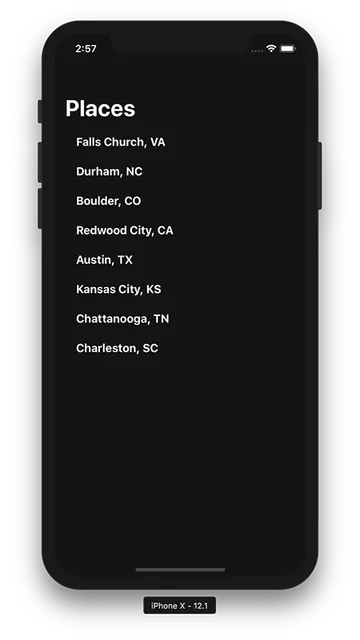
The profile screen in the app shows a table view (UITableView in iOS) which animates a snake-like border through the cells when the view is displayed.
It took me a while to figure out how to achieve this, and there weren't many resources online for such a specific visual effect, so I thought I'd share how one might tackle a problem like this by leveraging the Core Animation API in iOS. In particular, we'll be exploring bezier paths and Core Animation layers to achieve this effect.
Getting Started #
Before we get started, let's make sure you have everything set up. You will need a macOS machine in order to build iOS apps, so make sure you're developing on one. You'll also need Xcode to be able to open and run the project on your computer. Download Xcode (it's a huge app so it may take a while). Go ahead and clone the repository if you want to build the project yourself. Some exposure to iOS development and Swift is strongly recommended in order for this tutorial to be beneficial. If you haven't done iOS development before, check out this iOS and Swift for Beginners course to get your feet wet and revisit this tutorial!
Once you've cloned the repo, you can double click the SnakeyTable.xcodeproj file to open it in Xcode. The example app is pretty straightforward, let's crack open the Main.storyboard file to get a sense of its structure.
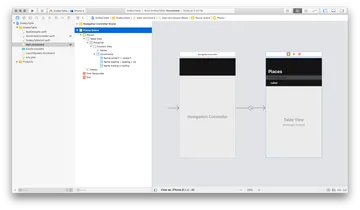
So, we've got a UINavigationController as the root of the app, which embeds an instance of UITableViewController called HomeViewController inside of it. The two files we're concerned with here is HomeViewController (which hosts the UITableView object) and SnakeyTableCell, our custom cell class which subclasses UITableViewCell. This is a pretty standard iOS table view setup, so if this feels unfamiliar, I encourage you to read up on Apple's documentation on table views.
Let's take a look at the HomeViewController, which is going to host the actual UITableView.
import UIKit

class HomeViewController: UITableViewController {

    // MARK: - Properties

    var shouldAnimateCells = true
    let places: [String] = [
        "Falls Church, VA",
        "Durham, NC",
        "Boulder, CO",
        "Redwood City, CA",
        "Austin, TX",
        "Kansas City, KS",
        "Chattanooga, TN",
        "Charleston, SC"
    ]

    // MARK: - Lifecycle

    override func viewDidAppear(_ animated: Bool) {
        super.viewDidAppear(animated)
        shouldAnimateCells = false
    }

    private func setupTableView() {
        tableView.register(PlaceCell.self, forCellReuseIdentifier: "PlaceCell")
    }

    // MARK: - UITableViewDelegate

    override func tableView(_ tableView: UITableView, heightForRowAt indexPath: IndexPath) -> CGFloat {
        return 44
    }

    override func tableView(_ tableView: UITableView, numberOfRowsInSection section: Int) -> Int {
        return places.count
    }

    override func tableView(_ tableView: UITableView, cellForRowAt indexPath: IndexPath) -> UITableViewCell {
        let cell = tableView.dequeueReusableCell(withIdentifier: "PlaceCell", for: indexPath) as! PlaceCell
        cell.name.text = places[indexPath.row]

        return cell
    }

    override func tableView(_ tableView: UITableView, willDisplay cell: UITableViewCell, forRowAt indexPath: IndexPath) {
        if shouldAnimateCells, let placeCell = cell as? PlaceCell {
            // Animate the custom separators here.. more to come later.
        }
    }

}
All we're doing here is taking an array of Strings and rendering them into the table view. The key part of the code is in the final overriding method willDisplay, which is going to fire right before drawing each row. We'll invoke a couple methods here that will be defined in our custom SnakeyTableCell class later on in the post. For now, PlaceCell is what is going to be hooked up to each cell of table, and is going to inherit from SnakeyTableCell, which will be a barebones subclass of UITableViewCell.
class PlaceCell: SnakeyTableCell {
    @IBOutlet weak var name: UILabel!
}

class SnakeyTableCell: UITableViewCell {
    // Custom rendering code here.
}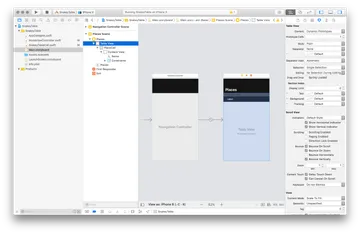
Do be sure to set the Separator property to 'None' in the Attributes Inspector pane of Xcode. This can be done by selecting the Table View in the Document Outline pane to the left of the Storyboard scene. Your table view should now have no separators, and should be rendering a vanilla list. Styling is up to you otherwise.
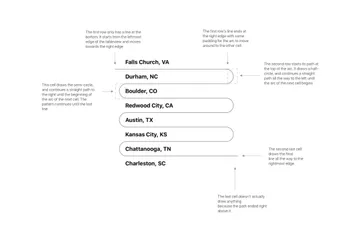
So, we now have the table view rendering as expected. The next step is to implement the custom methods we were talking about above which will fire off in the willDisplay override of the table view. These are going to be calledrender and animate methods of our custom cell class, and that is going to be the bulk of the custom code. Before we start writing the code, let's take a minute to understand the anatomy of the visual effect. We need to break it down into smaller problems so we can understand how to draw the path to spec.
Now that we can clearly see the different components of the path and how the cells join them together, let's work through the code piece by piece. Let's revisit the barebones subclass we had for SnakeyTableCell and set it up for drawing a custom path.
import UIKit

let ANIM_DURATION: Double = 0.25

class SnakeyTableCell: UITableViewCell {

    var xPadding: CGFloat = 36.0
    var path: UIBezierPath!
    let strokeColor = UIColor(red: 0.4, green: 0.4, blue: 0.4, alpha: 1.0).cgColor
    lazy var shapeLayer: CAShapeLayer = {
        let sLayer = CAShapeLayer()
        sLayer.fillColor = UIColor.clear.cgColor
        sLayer.strokeColor = strokeColor
        sLayer.lineWidth = 1.0
        sLayer.strokeEnd = 1.0

        layer.addSublayer(sLayer)
        return sLayer
    }()

    override func prepareForReuse() {
        super.prepareForReuse()
        reset()
    }

    private func reset() {
        path = UIBezierPath()
        updateShapeLayer()
    }

    private func updateShapeLayer() {
        shapeLayer.path = path.cgPath
    }

    // Implement these.

    func render() {
        // ...
    }

    func animate() {
        // ...
    }


}
So, what've we got here? We've got the main UIBezierPath, which is going to be store the drawing path for each cell. Then, we've got the CAShapeLayer, which is what is going to take the path's curve data and animate itself across each cell. These are the two crucial components of this effect. Think of the shapeLayer property as an actual paintbrush, and the path property as the trajectory of the paintbrush. The strokeColor is up to you, but the xPadding property is going to determine how much room we leave on each side of the arc.
Now, let's start implementing the render method, which is where we'll be drawing the path out.
func render(position: Int, total: Int) {
    let isFirst = position == 0

    // These are counted with offsets to account for zero-based numbering
    let isEven = (position + 1) % 2 == 0
    let isLast = position + 1 == total
    let isSecondLast = position + 2 == total

    // The last cell should not draw anything.
    if isLast {
        return
    }

    // Each cell will start with its own fresh, discrete path
    path = UIBezierPath()

    if isFirst {
        drawFirstPath(path, total: total)
    } else if isEven {
        drawEvenPath(path, isSecondLast: isSecondLast)
    } else {
        drawOddPath(path, isSecondLast: isSecondLast)
    }

    updateShapeLayer()
}
We've now introduced three other methods, all of which are going to draw specific types of paths depending on its position in the table. The updateShapeLayer method is what's going to set the path data we just calculated and pass it into the CAShapeLayer's path property. Let's take a look at the drawFirstPath method.
/// Draws a line from the lower left to lower right of the first cell.
private func drawFirstPath(_ path: UIBezierPath, total: Int) {
    let width = frame.size.width
    let height = frame.size.height
    let padding = total == 2 ? 0.0 : xPadding

    path.move(to: CGPoint(x: 0.0, y: height))
    path.addLine(to: CGPoint(x: width - padding, y: height))
}
This one is fairly straightforward, we start the path at x = 0.0 and y at the bottom of the cell (frame.size.height), which will then draw a line all the way towards the right side of the cell. If there's only 2 cells, we'll draw just one line all the way to the edge, otherwise, we'll stop with some room left for an arc to be drawn.
/// Right tip of the cell, which arcs around and travels to the lower left edge of the cell
private func drawEvenPath(_ path: UIBezierPath, isSecondLast: Bool) {
    let centerY = frame.size.height / 2
    let height = frame.size.height
    let width = frame.size.width

    // The radius of each arc is equal to half the cell height
    let arcRadius = frame.size.height / 2
    let arcCenter = CGPoint(x: width - xPadding, y: centerY)

    path.addArc(
        withCenter: arcCenter,
        radius: arcRadius,
        startAngle: 3 / 2 * .pi,
        endAngle: .pi / 2,
        clockwise: true
    )

    path.addLine(to: CGPoint(x: isSecondLast ? 0.0 : xPadding, y: height))
}
This one's a fun one. We're going to draw the arc to go around the next cell, and move all the way to the left until we come to a point where we want to draw another arc. If you refer to the anatomy diagram we looked at above, this would be drawing an arc on the right side of the Durham, NC cell and draw a line towards the left side of Boulder, CO. Keep in mind the startAngle, endAngle, and clockwise arguments of the path.addArc() call. Refer to this handy unit circle chart from Apple's docs if you need to brush up on some trigonometry.
/// This is the left end of the cell, which arcs around and travels to the right edge
private func drawOddPath(_ path: UIBezierPath, isSecondLast: Bool) {
    let width = frame.size.width
    let height = frame.size.height
    let centerY = frame.size.height / 2

    // The radius of each arc is equal to half the cell height
    let arcRadius = frame.size.height / 2
    let arcCenter = CGPoint(x: xPadding, y: centerY)

    path.addArc(
        withCenter: arcCenter,
        radius: arcRadius,
        startAngle: 3 / 2 * .pi,
        endAngle: .pi / 2,
        clockwise: false
    )

    path.addLine(to: CGPoint(x: isSecondLast ? width : (width - xPadding), y: height))
}
Similar deal here, except we'll flip the clockwise flag to tell iOS to draw it the other way around.
We're almost done! Let's flesh out the animation routine. We'll animate the strokeEnd property, which is the relative location at which to stop stroking the path. To give our path animation an illusion of continuity, we'll use the DispatchQueue to asynchronously queue up the animation with varying degrees of delay.
func animate(position: Int) {
    // This is set to 0, so nothing in the path will be drawn initially.
    shapeLayer.strokeEnd = 0.0

    // The stagger value should start with a min. of 1, even if array index is 0.
    let stagger = ANIM_DURATION * Double(position + 1)

    DispatchQueue.main.asyncAfter(deadline: .now() + stagger) {
        self.shapeLayer.strokeEnd = 1.0

        let animation = CABasicAnimation(keyPath: "strokeEnd")
        animation.fromValue = 0
        animation.toValue = 1
        animation.duration = ANIM_DURATION

        self.shapeLayer.add(animation, forKey: nil)
    }
}
Aaaand we're done, almost. We need to actually invoke the render and animate methods in the willDisplay function of the table view, remember? That should look like:
override func tableView(_ tableView: UITableView, willDisplay cell: UITableViewCell, forRowAt indexPath: IndexPath) {
    if shouldAnimateCells, let placeCell = cell as? PlaceCell {
        placeCell.render(position: indexPath.row, total: places.count)
        placeCell.animate(position: indexPath.row)
    }
}
Closing Thoughts #
That's it! Hopefully this post outlines some new techniques for you to use in your table view designs, but generally CAShapeLayer objects can be used on any UIView in iOS, so get creative! If you run into a new way of playing with this powerful path drawing tool, I'd love to learn about it in the comments below.