How to Create Prototypes With Omnigraffle

Omnigraffle has become my hammer for creating a variety of things. I use it for wireframes, sitemaps, concept models, charts, reports - pretty much whenever I need to create a document. So, while there are a number of other great prototyping tools like Axure, Protoshare, and plain old HTML, I look to Omnigraffle first when I need a simple, clickable prototype. Here's a quick overview of how to do that.
Adding Actions to Objects is Simple
Just select an object and pull up the Inspect window. Within the Properties section, select the third option, labeled Actions.
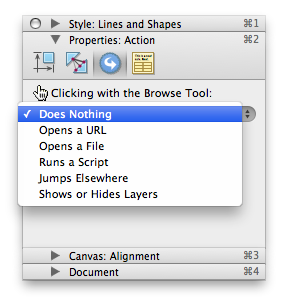
By default, all objects are set to "Do Nothing". To make an object do something on click, change this selection to one of three actions; "Opens a URL", "Jumps Elsewhere", or "Shows or Hides Layers". There are two others, but I have not found a use for "Opens a File" yet and "Runs a Script" is too fancy for me. I should also note that "on click" is the only trigger Omnigraffle can handle. If you need to mock up hover actions or data entry, you probably need another tool.
- Opens a URL - Use this to link to external websites. For example, you may wish to link a Tweet button to Twitter.com.
- Jumps Elsewhere - Use this to link to other canvases in your Omnigraffle doc. Personally, I like to keep canvases in Omnigraffle analogous to pages on a website, so I try to only use this action when linking to unique pages. It's also nice to use this to link form submit buttons to the page users should be redirected to when the form is submitted.
- Shows or Hides Layers - I'm a big fan of this action for mocking up interactions within a page. A good example of when to use it is if you want a modal window to appear when the user clicks a button. To do this, create a new layer of your canvas called "Modal Window" and set it to hidden. Then set the action on the button to show the modal window layer. For a final touch, create a close button and set its action to hide the modal window layer. Using "Show or Hides Layer" for these types of interactions keeps the number of canvases you have to manage from getting out of hand.
Using Your Prototype
- In Omnigraffle - The quickest way to try out your new prototype is to just use Omnigraffle. To interact with the actions you've created, either hold down "B" on your keyboard or turn on the Browse tool. You'll then notice that hovering over objects with associated actions causes a pulsating blue outline to appear. Clicking on the object will then execute the action. For better presentation, it helps to select "Hide Toolbar" from the View menu. A big drawback to testing out your prototypes in Omnigraffle is that standard browser actions, specifically back, are not present.
- Outside of Omnigraffle - If you want to share your prototype with others who don't have Omnigraffle, you'll need to export it. You can do this as either a PDF or as HTML. I prefer HTML because the person testing the prototype will experience it within a regular browser. This helps both because it simulate the look and feel of a web experience and because most of the standard browser actions are supported. The biggest drawback however of using either export option is that they do not support the "Shows or Hides Layers" action. If you're going to export your prototype, you'll need to stick to linking between canvases and to external URLs.
If you have any tips, comments, or questions about making Omnigraffle prototypes, please leave some comments. I'd be happy to discuss.