How to Create More Accessible Content, Part 2: Media
Megan Zlock, Former Front-End Development Director
Article Categories:
Posted on
How to make images, videos, audio, and other media accessible and WCAG compliant.
Continuing from my previous post (which covered writing accessible copy), I’ll dive right in this time and go over how to make your media content accessible.
1. Write Good Fall-Back Text for Images
You can only really use one sense to experience an image: sight. And of course, as the accessibility standards say, everything on a web page should be perceivable to multiple senses. So, how do you solve this?
The W3C’s solution to this in code (HTML) is “alt text.” Alt in this case stands for “alternate.” This is a piece of text that is associated with an image that isn’t visible, but can be read aloud by screen-reader applications. Your Content Management System (CMS) will usually have an easy-to-find place to write this text when you upload an image (keep in mind you likely won’t see this prompt when re-using an image). Alternatively, your CMS could use a different field like “Title” instead for your alt text. Ask your developer to be sure.
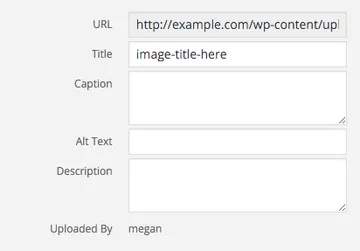
It’s important that you fill in this field, since screen readers, when given no alt text, will start reading through the filename. This can be especially unhelpful if you’ve got something like “HSF-00019832.jpg” as the filename.
Also, be as descriptive as you can without going so far as Shakespearean prose. If there’s text in the image, re-state it. Try to name people in the photo if you’re able and say what they’re doing. Be as descriptive as you can, but don’t be repetitive.
2. Know When Not to Have Fall-Back Text for Images
Try to ignore the glaring conflict with rule #1 for now. It may seem strange, but in some cases it is better for there to be no fall-back text on an image to avoid repetition. The most common example I can give is a list of people or team members.
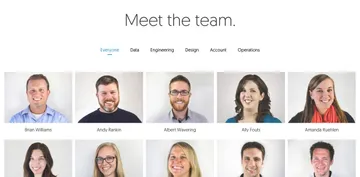
As seen in the example (from our own viget.com), each staff member already has their name listed. Unless you want to start describing people’s faces in detail, adding alt text to the headshots above their names would likely be very repetitive. In this case, I would leave the alt text blank on these images. There is a way to leave blank alt text without the filename being read (examples below). Talk to your developer about the best way to do this with your CMS. They may be able to take care of it for you or you might have to make some adjustments as you add the images to the page. If all else fails, repetition is better than a filename being read.
For the more tech savvy readers, here are the three uses of alt text:
<!-- Read the alt text -->
<img src="HSF-00019832.jpg" alt="A group of students gather in the quad." >

<!-- Screen readers should ignore this image and read nothing -->
<img src="HSF-00019832.jpg" alt="" >

<!-- The screen reader will read the gibberish filename -->
<img src="HSF-00019832.jpg" >
This rule can go alot further and can help eliminate a lot of repetition. Does your site have captions for each image? You don’t need alt text. Is your photo just for visual appeal and doesn’t really add to the content of the page? You don’t need alt text. Does your entire article describe what’s happening in the image at the top? Alt text might be nice, but you don’t need it.
As WebAIM says, context is everything when it comes to images and alt text. Refer to their alternative text guide for a great cheat-sheet when you’re not sure.
3. Add Video Captions
Video is a bit of an odd media when it comes to accessibility standards since it is technically both audible and visible (multiple senses can perceive it). Most other standards are met with two senses, but video is a special case. Simply put, the audio and visuals in a video are just too different to paint the whole picture alone, so we need to provide some further fallbacks.
To provide a fallback for video audio, video captions are necessary (they’re also required by the FCC and WCAG AA web accessibility standards). YouTube and other video services do offer auto-captioning, but be advised these services are very flawed. They can misunderstand words or completely wreck the timing. Ultimately, it’s best to caption videos yourself or employ a service to make them for you.

YouTube has some decent documentation and process videos on how to start adding captions to your videos. You can reference their help section as well for more information. Vimeo has some documentation on captioning as well, but their captioning service requires you to create specific files or pay for a secondary service to create those files for you. HTML5 videos, which are self-hosted and don’t come from a service, can have captions too, but that would require a specific caption file type (such as a .vtt file) just like Vimeo and your developer would have to add it as a track element in the video’s HTML.
Note: Be aware that WCAG AA compliance requires that all videos on your website have captions, regardless of whether you created the video or not. Embedding a non-compliant video in your website will make your website non-compliant.
4. Create Video and Audio Transcripts
While in the process of adding captions to your videos, you may find yourself writing a transcript. That is, a text file that lists out all that is said within an audio or video file and should also include descriptions of actions and other cues. Transcripts should always go further than captions and give a full picture of what is happening. Note when scenes change or people move. The transcript should be able to stand on its own without the audio or video.
Since you’ll probably have to list out all of the dialog while creating captions anyway, it’s not much more work to flesh out that script into a transcript. And once you’re done, that transcript can have a place on your website too.
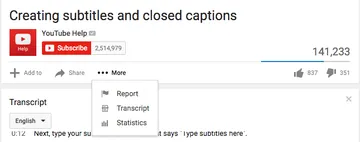
YouTube provides a link to a transcript if it exists for that video. That’s nice, but this only exists on the YouTube page for the video and isn’t included in the embed code that you would use on your website. That just means your developer might have to add a small change to your website.
Some techniques for adding transcripts to your website:
- Copy-and-paste your transcript into the page as body copy. This works best when there is very little content on the page other than the video.
- Link back to YouTube underneath the video. (Example link: “Find the full transcript on YouTube”) Of course, this requires you to upload your transcript to YouTube.
- Link to a different page on your website which has the full transcript.
- Use a 3rd-party transcript plugin (added by your developer) to display the transcript.
- Have your developer create an expandable area below videos for transcripts.
The last option takes the most work from your developer, but can be an elegant solution because your site visitor would not have to leave the page to read the transcript and you can control the style of the text. The transcript text could either be pulled from YouTube or from a separate field in your CMS.
Note: Any of the techniques above which involve adding the transcript text to your page have the added benefit of improving your SEO. All of that transcript text is machine-readable and searchable.
Since audio files don’t have a place for video captions, then a transcript becomes all the more important. Luckily, the same techniques can be applied to audio as well as video, so if you are accommodating one source, you’ve got the other covered. Audio can even be hosted on YouTube, should the accessibility features be worth the oddity of having no video or a still image in place of video. This is an strange technique, but I haven’t found any audio hosting services which can compare to YouTube’s accessibility features. If you know of one, please share!
Before I move on, I do want to stress that not only are captions and transcripts helpful for those with impairments; they are helpful to pretty much everyone, so it's all-around worth the effort. You never know when someone might be perusing your site in a noisy corner at work or maybe they might be searching late at night when they can’t make any noise. If you’re always accommodating to your users, they’re more likely to enjoy your website and complete their tasks.
5. Avoid PDFs or Duplicate Their Content
PDFs are used a lot on the web, but most aren’t accessible. PDFs can be made to be accessible, but the process can be tedious and finding design talent that knows how to do this is very challenging.
It is unlikely that your PDFs are accessible, so avoid using them on your website. If you do provide a PDF download, then try to include at least some of the content in the PDF on your webpage. It should give your SEO a boost for those pages as well.
6. Assess Accessibility for Data and Graphs
Interactive data and graphs are getting more and more prevalent on the web. People love infographics and how they can make visual comparisons. However, this “media” is particularly challenging and there simply is no straight-forward way to make these graphics accessible while remaining easily edited by content managers.
At minimum, if your graphs appear as images on your website, go back to rule #1 and try to write some really good alt text for those graphs. Identify trends or take-ways in the graph. Write out each piece of data if you can. Too much information is better than not enough.
If you’d like to go further, then there are many ways to build accessible graphs, but most require custom development and/or the use of a JavaScript library. However, JavaScript charting libraries can also be a mixed bag and may or may not make accessible graphs. Properly vet any libraries you or you developer might be planning to use.
7. Have a Good Relationship with Your Developer
To wrap, the best thing you can do to ensure your media content is accessible is to have a good relationship with your developer. Doing everything on this list without any development changes may be difficult, if not impossible. Work with them to see where you can eliminate repetition in your work-flow and make some of these challenges easier. If their knowledge of Accessibility guidelines is limited, then make it clear what your requirements are and work with them to find a solution.