Basic GraphQL API with Node, Prisma and Apollo

Let's build a GraphQL API with Node.js, Prisma, and Apollo!
Let's build a backend for a webapp using JavaScript!
Why would we do this? Isn't JavaScript for browsers?
Well, yes, but also no. We can utilize Node.js, built on Chrome's V8 JavaScript engine, to build a backend in JavaScript. Now your frontend developers and backend developers can talk the same language, hopefully saving you some time and better unifying your team's shared knowledge.
Today, we're going to build a basic backend for a webapp using Node.js, Prisma, and Apollo Server.
Our Tech Stack #
- Node.js is an open-source JavaScript runtime. We're going to be using version 14 today.
- Yarn is an open-source package manager for Node.js and an alternative to Node's built in package manager, NPM.
- Prisma is an ORM built on Node.js. We'll be using it to help us communicate with our database and help us manage our database schema.
- Apollo Server is an open-source GraphQL server. We'll be using it to build the GraphQL API that another application could consume.
- GraphQL is a query language for our API. We'll be using it to fetch data from our database.
- Docker is used to help cut down on the headache of setting your database. As a bonus, we'll also be able to create a Docker image of our backend for easy portability.
- PostgreSQL is our open-source relational database.
If that all seems like a lot, don't worry! We're going to take this step by step! Here we go!
If you just want to get to the code, you can checkout my repo on GitHub.
Initializing #
To get started, first make sure you download and install (Node.js v14)[https://nodejs.org/en/download/].
Once you've installed Node, you can install yarn via npm install -g yarn.
Create a directory and name it node-backend. Open your terminal and navigate to your new directory. Start up the project with a simple yarn init --yes
The --yes flag sets all of the defaults and creates a package.json which should look something like this.
// package.json
{
  "name": "node-backend",
  "version": "1.0.0",
  "main": "index.js",
  "license": "MIT"
}
We're going to make one immediate change. Change the "main" attribute to be "src/index.js". This just tells Node where the main entry point of your application is.
Your package.json should look like this now.
// package.json
{
  "name": "node-backend",
  "version": "1.0.0",
  "main": "src/index.js",
  "license": "MIT"
}
Setting up the Server #
It's time to actually set up the server. First, run yarn add apollo-server graphql to install Apollo Server and GraphQL.
Then create a src directory and two files: index.js and schema.graphql. index.js is the entry point for our application while schema.graphql is where we'll define our GraphQL schema. Pretty straight forward so far.
schema.graphql #
We'll be changing up this file as we go, but for now, we're going to add the following types.
# schema.graphql

type Query {
  getAllAnimals: [Animal]
}

type Animal {
  id: ID!
  name: String!
  fact: String
}
Let's break this down. First we defined a type called Query. This is where all of our query definitions will live! We've defined one query called getAllAnimals that returns an array of Animals.
Next, we defined a type called Animal. This type has a couple of fields on it. name is the name of the animal and is of type String!. That ! on the end says that the name field is a required field. Meanwhile, the fact field is also a string, but since it doesn't have the ! in its defnition, it's not required. GraphQL will throw an error if you try to query something required and it is not present.
index.js #
Let's build out are actual server a bit.
// index.js

const { ApolloServer } = require('apollo-server')
const { readFileSync } = require('fs')
const path = require('path');

const animals = [
  {
    name: 'Lion',
    fact: 'During the Neolithic period, lions ranged throughout Africa, Southeast Europe, and Western and South Asia.'
  },
  {
    name: 'Goose',
  }
]

const resolvers = {
  Query: {
    getAllAnimals: () => animals
  }
}

const server = new ApolloServer({
  typeDefs: readFileSync(
    path.join(__dirname, 'schema.graphql'),
    'utf8'
  ),
  resolvers,
})

server
  .listen()
  .then(({ url }) =>
    console.log(`Server is running on ${url}`)
  )
Let's break down what's going on here.
First, we're requiring the necessary packages. Pretty standard stuff.
Next, we're defining a constant called animals. This is our static data until we set up the database.
We're also creating our resolvers. For now, we're defining them in our index, but we'll break them out later.
Resolvers basically tell the server how to get the information you want from your data, or how to put information into your data. The only one we're defining here is getAllAnimals, which just returns the animals constant we defined earlier.
Next, we set up ApolloServer. We have to pass in our typeDefs from our schema.graphql. This can be a little tricky. We have to read in our schema file with readFileSync from Node's fs package. Different versions of Node might handle this differently, so watch out! We also pass in our resolvers here.
Finally, we call the server and tell it to listen for activity. This defaults to port 4000 on localhost, but you can customize it as needed! Just provide the appropriate port to the listen() function. For example, example(3000) to host the application on port 3000!
You can now run the server from your node-backend directory by running node src/index.js!
If you open a browser and navigate to localhost:4000, you'll see a splash screen for querying your server.
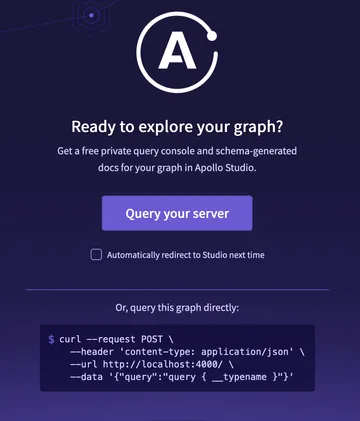
Click the button and you'll be able to click around and query your server.
If you add the following to your "Operations" panel, you'll be able to run the query we built earlier.
query Query {
  getAllAnimals {
    name
    fact
  }
}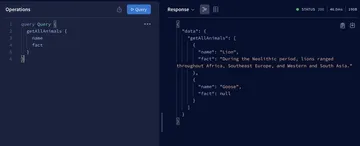
So, what's this doing? Pretty simply, we're calling getAllAnimals and asking graphQL to return the name and the fact for this query. What we get is an array of objects. Note that fact for goose is null. Had we required fact, we would have an error here.
You now have a graphQL server with Apollo Server. Play around a bit before moving on to the next step!
Setting up your database #
Time to break out Docker and get our database up and running.
For this example, we're using Postgres, but you can use SQLite, MySQL, MongoDB, or SQL Server.
Since we don't want to worry about collision with other installations of Postgres, we'll set docker-compose.yml to set up our database.
In your node-backend directory, create docker-compose.yml and add the following.
# Dockerfile

version: "3.9"
services:
  db:
    image: postgres:13
    restart: always
    environment:
      POSTGRES_PASSWORD: password
    volumes:
      - db:/var/lib/postgresql/data
    ports:
      - 5433:5432

volumes:
  db:
This just sets up Postgres 13 with a persistent volume. Couple of super important things to note here. We're binding Postgres to port 5433 on your local machine. This is to prevent collision between a previously install Postgres and this version. If you already have other apps using this port, just bind it something else.
We're also hard coding the password to 'password'. Don't do this in production. Ever. Please.
Now, open a new terminal and navigate to node-backend. Then run docker-compose up to start up Postgres!
In your first terminal, kill your server with Ctrl-C if you haven't already. Let's add Prisma with yarn add @prisma/client and yarn add --dev prisma.
Once they're installed, run yarn prisma init. This will create a .env file and a prisma directory. Inside the prisma directory, you'll have a file called schema.prisma which has a few items in it currently. Don't worry too much. They just tell Prisma how to connect to your database and set up your client.
Instead, let's set up our first model.
Add the following code to the end of your schema.prisma file.
// prisma.schema

model Animal {
  id      String    @id @unique @default(uuid()) @db.Uuid
  name    String    @unique
  fact    String
}
This should look a little familiar. It's the same Animal type from your schema.graphql, but adapted for our database. Let's break it down.
We have a new field, id, which is a "string". Postgres normally intreprets this as "text", but we also added a few other type attributes. @id marks this field as the primary key. @unique says that the field must be unique - no collision allowed! @default(uuid()) tells Postgres to create new entries in this field with a uuid. Finally, @db.Uuid tells Postgres that this field is a uuid type instead of a text type.
That's a chunk of information in such a small line of code. Fortunately, the others are straight forward. name is a text field with a unique constraint and fact is just a straight text field.
Once you've got this, run yarn prisma migrate to create your Prisma Client, then open .env
We need to update our connection string to match our database. It should look like this.
# .env

DATABASE_URL="postgresql://postgres:password@localhost:5433/db?schema=public"
You can break the connection string down as follows:
postgresql://<username>:<password>@<host:port>/<dbname>?schema=publicPostgres defaults the user to be "postgres" and we set the password to the incredibly insecure "password". Have I mentioned this isn't production ready yet? We're on localhost and using port 5433 to host Postgres.
Now, you should be good to go. Run yarn prisma migrate dev --name initial_migration to sync your database with your schema.
Head back into your src/index.js. Time to add Prisma to the server!
Require the PrismaClient and instantiate it.
// index.js

const { ApolloServer } = require('apollo-server')
const { readFileSync } = require('fs')
const path = require('path')
const { PrismaClient } = require('@prisma/client')

const prisma = new PrismaClient()
Let's update our getAllAnimals query to look in the database.
// index.js

const resolvers = {
  Query: {
    getAllAnimals: async (parent, args, context) => {
      return context.prisma.animal.findMany()
    }
  }
}
You can also remove animals now.
Finally, add prisma as a context for Apollo
// index.js

const server = new ApolloServer({
  typeDefs: readFileSync(
    path.join(__dirname, 'schema.graphql'),
    'utf8'
  ),
  resolvers,
  context: {
    prisma,
  }
})
Start your server with node src/index.js and try to run your query. You should get an empty array back! That's okay, we're going to add some data next!
Adding Data and Minor Improvements #
Let's add some data to your database! First, kill your server with ctrl-c.
In your schema.graphql add a new type: Mutation:
# schema.graphql

type Mutation {
  addAnimal(name: String!, fact: String): Animal
}
This works just like a query, but we've got some new stuff. addAnimal takes two arguments: a name and a fact. Name is a required string while fact is not required. This will return a single Animal.
Now, when you start your server back up, you should have a new mutation.
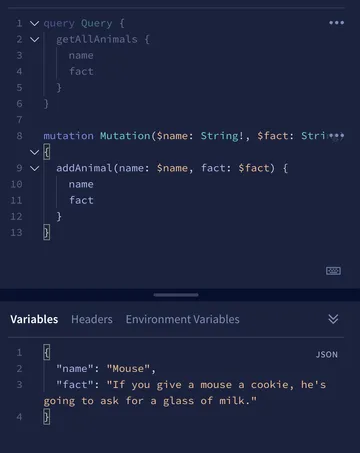
mutation Mutation($name: String!, $fact: String) {
  addAnimal(name: $name, fact: $fact) {
    name
    fact
  }
}
And add some variables
{
  "name": "Mouse",
  "fact": "If you give a mouse a cookie, he's going to ask for a glass of milk."
}
It should look something like this
And when you run the mutation, you should get a response! Also, if you run getAllAnimals, you should get back all of the animals you've added!
Improving Docker #
Let's add our server to our docker-compose.yml
First off, any time you want make changes to your app, you have to restart the server. That's lame, let's fix it.
Let's add nodemon, a utility package that watches for code changes and restarts your application. Run yarn add nodemon, then add the following to your package.json
// package.json

"scripts": {
  "dev": "nodemon ."
},
Your package.json should look like this when you're done.
// package.json

{
  "name": "node-backend",
  "version": "1.0.0",
  "main": "src/index.js",
  "license": "MIT",
  "scripts": {
    "dev": "nodemon ."
  },
  "dependencies": {
    "@prisma/client": "^2.29.1",
    "apollo-server": "^3.1.2",
    "graphql": "^15.5.1",
    "nodemon": "^2.0.12",
  },
  "devDependencies": {
    "prisma": "^2.29.1"
  }
}
Now, you can run yarn dev to start your server. It will restart whenever you save changes to it!
On more quick improvement... let's add our server to our docker-compose.yml. First, create a new Dockerfile.
# Dockerfile

FROM node:14
WORKDIR /
COPY . /

RUN yarn
RUN yarn prisma generate

EXPOSE 4000
Create a .dockerignore
# .dockerignore

.git
/node_modules
Then add your server to the services in your docker-compose.yml
# docker-compose.yml

services:
  db:
    ....

  node-backend:
    working_dir: /app/node-backend
    restart: always
    build:
      context: .
    volumes:
      - .:/app:delegated
    command: yarn dev
    ports:
      - 4000:4000
We also need to update our .env
# .env

DATABASE_URL="postgresql://postgres:example@host.docker.internal:5432/db?schema=public"
Only thing here is the changing localhost to host.docker.internal so Prisma knows where Postgres is living in relation to it.
Now, kill your running docker-compose up with ctrl-c, run docker-compose build then docker-compose up to get your server and database up and running!