Animate Your iOS Splash Screen

Doug Avery, Former Senior Developer
Article Category:
Posted on
Learn how to animate iOS launch screens however you want!
Our internal Spots You app has a fun intro animation I like showing off. The splash screen splits into two pieces to quickly reveal the app UI:

The animation was easier to build than I expected, and I wanted to see if I could do something even fancier. In this post, we're going to learn how to make an iOS launch screen that "opens" the way a camera aperture ring does. Here's what we're going to build:

Neat, huh? If you want to follow along, you can create a new project in XCode or clone the GitHub repository for the final project but I'd recommend downloading the project either way. This example app has all the finished code you need, and a bit more. It also contains design files and pre-exported assets you can use to quickly build the effect.
How do launch screens work on iOS?
A launch screen is a very simple visual that iOS displays while loading an app. Once the app loads, the screen fades out, revealing your app UI.
These screens are completely static for a reason: Apple doesn't want you running code or performing any CPU-intensive tasks while the app boots. Due to this restriction, you're only allowed to use three types of file for a launch screen: A image, storyboard, or a nib (*.xib) file
When using a storyboard or nib, note that you can't write any view code to accompany it. Tasks like adding borders, rounding corners, etc that you would usually place in view code are unavailable here — we must construct this screen entirely in Interface Builder.
In order to "animate" a launch screen, we'll create a three-step illusion:
- Display the static launch screen while launching.
- When the app finishes launching, paint an identical-looking view — a pseudo launch screen — over the app.
- Animate parts of this pseudo launch screen away, and remove the view.
Create the illusion
We need to create a pseudo-launch screen out of views that can be selected and animated, and this screen must be perfectly visually aligned with the real launch screen. The best choice for this is a nib.
Using an image is tempting, but it would require saving and positioning a separate image (and keeping it in sync with the pseudo launch screen). Too painful 😔. A storyboard simply won't work in this case, as it's not possible to load/render them the way we can with nibs.
So, step one:
- Create a LaunchScreen.xib file by selecting File > New File and choosing "View".
- Delete the existing LaunchScreen.storyboard your project may already have.
- Go to your app target's General tab and set "Launch Screen File" (under "App Icons and Launch Images") to your new nib.
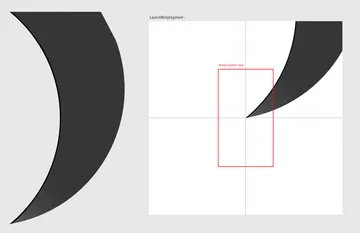
Setting up images
The "overlap" illusion
Now here's a tricky part: A camera's aperture ring is made of several metal plates that overlap in a circle. The rings are tilted slightly to allow each segment to overlap the previous segment.
Unfortunately, UI renderers don't have the concept of "tilting": a view is either above another view or below it. We can't construct this effect simply by overlapping a set of rectangles like on a real ring. Instead, we're going to build ring segments that have the illusion of overlapping — but are actually just interlocked triangles.
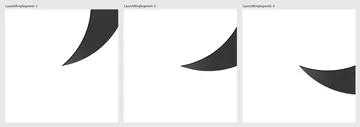
Designing the ring
We start by designing our 12 ring segments in an image editor. I used Affinity Designer, but vector software like Figma or Illustrator will work just as well.
For reasons we'll discuss later, your ring needs to be larger than your target screen size. For now, set up your canvas at twice the height you want it to render on-screen. (I suggest a 1792px square, twice the height of a Pro Max).
The segments have one hard rule: They must cover 30 degrees of the canvas (360 / 12). There are a few more optional rules I followed as well:
- Each segment must have a line on the counter-clockwise side. Without this, the segments blend together and ruin the effect.
- Each segment must have a gradient that gets lighter towards the center point. This isn't necessary, but it makes the effect a little bit nicer.
- Each segment must have an equal curve on each side, mimicking a real aperture ring. Again, this just improves the effect (but it's a little more labor-intensive to design).
Aligning the segments
Each segment ends up with a unique position and size on the canvas. Instead of fussing with layout in Xcode, just cut out each segment at the full square size, with space around it. This way, aligning all 12 squares is easy, because they stack perfectly over each other.
Building the nib
The nib is pretty straightforward, but it's a bit time-consuming to construct in Interface Builder.
Here are the basics:
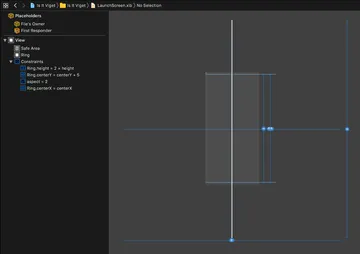
- Ensure the top-level view has a "Clear Color" background.
- Create a view (named "Ring") with these constraints:
- Height: Parent view height * 2 (Remember my note earlier: You need to set the ring up to be double the screen height. I'll explain why soon!)
- Width: Parent view height * 2
- Position: Centered vertically and horizontally in the parent view.
At this point, your structure should look like this:
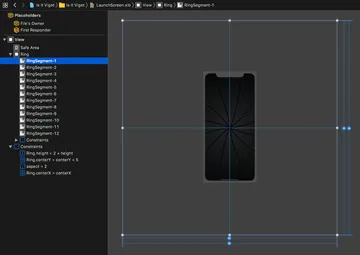
Now it's time to add ring segments. Drag a UIImage named "RingSegment1" into the "Rings" view. Give it constraints that fill Ring completely (height = parent height, centerX = parent centerX, etc). Set its image to the first ring segment, and you should see the beginnings of the final design:

The last thing to do before moving on is to give this view a "tag" of 1, using the attributes inspector. We'll be using these tags later to manipulate the view.
Now, repeat this step...11 more times, incrementing the tag number as you go. If you just want to see the final result, check out the GitHub project.
You should end up with something like this:
The LaunchScreenManager
Create a new class called LaunchScreenManager by going to File > New File and choosing Swift File. This class's role is to paint the pseudo-screen over our app, animate it, then remove it. We'll start with some code that takes a parent view and paints our LaunchScreen.xib over top:
import UIKit

class LaunchScreenManager {

    // MARK: - Properties

    // Using a singleton instance and setting animationDurationBase on init makes this class easier to test
    static let instance = LaunchScreenManager(animationDurationBase: 1.3)

    var view: UIView?
    var parentView: UIView?

    let animationDurationBase: Double


    // MARK: - Lifecycle

    init(animationDurationBase: Double) {
        self.animationDurationBase = animationDurationBase
    }


    // MARK: - Animation

    func animateAfterLaunch(_ parentViewPassedIn: UIView) {
        parentView = parentViewPassedIn
        view = loadView()

        fillParentViewWithView()
    }

    func loadView() -> UIView {
        return UINib(nibName: "LaunchScreen", bundle: nil).instantiate(withOwner: nil, options: nil)[0] as! UIView
    }

    func fillParentViewWithView() {
        parentView!.addSubview(view!)

        view!.frame = parentView!.bounds
        view!.center = parentView!.center
    }
}
Now, we need to call this on app launch. Go to SceneDelegate.swift and call animateAfterLaunch in the scene(willConnectTo) method:
func scene(_ scene: UIScene, willConnectTo session: UISceneSession, options connectionOptions: UIScene.ConnectionOptions) {
    guard let _ = (scene as? UIWindowScene) else { return }

    LaunchScreenManager.instance.animateAfterLaunch(window!.rootViewController!.view)
}
Run this on the simulator, and you should see that we've completed step one: Rendering the seamless pseudo-screen over your first view.
Animate the ring segments
Add the following call to LaunchScreenManager.animateAfterLaunch:
func animateAfterLaunch(_ parentViewPassedIn: UIView) {
    parentView = parentViewPassedIn
    view = loadView()

    fillParentViewWithView()

    // Add me!
    hideRingSegments()
}
Now, we need to write the hideRingSegments() method that animates all 12 ring pieces away. Before we get too fancy, let's start with a simple alpha transition:
func hideRingSegments() {
    let viewHeight = parentView!.frame.size.height

    for number in 1...12 {
        // Ring segments should be tagged 1-12
        let ringSegment = view!.viewWithTag(number)!

        UIView.animate(
            withDuration: animationDurationBase * 1.75,
            delay: animationDurationBase / 1.5,
            options: .curveLinear,
            animations: {
                ringSegment.alpha = 0.0
            }
        )
    }
}
Note the viewWithTag() call — this is the main trick behind the entire illusion. Tagging and selecting views like this allows you to construct a launch screen nib and manipulate it after launch, and the possibilities for how you animate it are endless!
Running in the simulator, you should now see the pseudo-screen fade away after briefly appearing on screen. A good start!
The next step is to figure out how to move the pieces into their final positions smoothly. Because we're throwing these views away once we finish animating, we don't need to actually change the X/Y positions of the frames (plus, it would be more work to calculate), so we're going to use CGAffineTransform instead.
(Note: This method is very similar to using transform: translate(X, Y) in CSS — it applies a visual transformation without updating the "real" position of an element).
The final transform function will look like the following code, but it won't work yet — we need to figure out the translationX and translationY values first.
...
animations: {
    ringPiece.transform = CGAffineTransform(translationX: translationX, y: translationY)
}
...
Here's another tricky part: To move a real aperture segment, you'd move it perpendicular to its inner edge. You'd calculate the angle of motion like so:
let segmentDegrees = 360 / 12 // 30
let segment1AnimationAngle = segmentWidth / 2 // 15
But our segments aren't overlapping rectangles like they would be on a real aperture ring — we can't move them away at a perpendicular angle, or they'll split:

Instead, we need to move them at an unintuitive angle: 30 degrees less than the above calculation. This means segment one is actually moving towards the 345 degree position. Even though it's on the top right of the screen, it's moving down and right when exiting. This is why we drew the segments at 2x the screen size earlier — if we hadn't, this movement would expose the edges of our images.
Once we know this angle quirk, it's just some simple trigonometry to figure out the final x/y for our segment (unfortunately, I don't know simple trigonometry, so I had to Google a bit to figure it out 😅). The final math looks like this:
func hideRingSegments() {
    // A large number to ensure that rotated segments don't partially
    // rotate back on-screen
    let distanceToMove = parentView!.frame.size.height * 2

    for number in 1...12 {
        // Ring segments should be tagged 1-12
        let ringSegment: UIView = view!.viewWithTag(number)!

        // Get the degrees we want to move to
        let degrees = 360 - (number * 30) + 15

        // Convert to float
        let angle = CGFloat(degrees)

        // Convert to radians
        let radians = angle * (CGFloat.pi / 180)

        // Calculate the final X value from this angle and the total distance.
        // See https://academo.org/demos/rotation-about-point/ for more.
        let translationX = (cos(radians) * distanceToMove)
        let translationY = (sin(radians) * distanceToMove) * -1

        UIView.animate(
            withDuration: animationDurationBase * 1.75,
            delay: animationDurationBase / 1.5,
            options: .curveLinear,
            animations: {
                var transform = CGAffineTransform.identity
                transform = transform.translatedBy(x: translationX, y: translationY)

                ringSegment.transform = transform
            },
            completion: { _ in
                self.view!.removeFromSuperview()
            }
        )
    }
}
The above image still isn't right, because as the segments move apart, space is visible between their curves. To fix, we need to update our code to rotate them slightly:
...
UIView.animate(
  ...
  animations: {
      var transform = CGAffineTransform.identity
      transform = transform.translatedBy(x: translationX, y: translationY)

      // This rotation accounts for the curve in the segment images.
      // I just eyeballed it; different curves will require different rotations.
      transform = transform.rotated(by: -1.95)

      ringSegment.transform = transform
  }
)

// When segments are very curved, sometimes pieces of them reappear on-screen
// before the animation finishes. This timer stops the animation early and removes
// the entire view.
DispatchQueue.main.asyncAfter(deadline: .now() + animationDurationBase * 1.25) {
    self.view!.removeFromSuperview()
}
...
Playing with the rotation should produce a result like this:

Here's the final effect, with some logo animations added over top:

Troubleshooting
Mis-aligned screens
Sometimes the pseudo-launch screen will appear to jump up slightly when it renders. In my experience, this was related to status bar preferences. Play around with the Info.plist, tweaking the "View controller-based status bar appearance" and "Status bar is initially hidden" settings as needed.
Launch screen not updating
When testing on a simulator, sometimes outdated launch screens will be cached. Try using "Hardware -> Erase All Content and Settings" on the Simulator menu to clear.
Thanks!
Animating launch screens is a lot of fun, and once you know the trick, not too tough to pull off. If you've come up with a cool animation, or a better way to build them, let me know in the comments!